Whether you’re spending the weekend brunching with girlfriends or chasing the kiddos around the park, my newest design – the Crochet Penelope Dress – has got you covered!
I set out to crochet a summer dress perfect for all warm weather occasions and decided to try out a new technique with a yarn that’s one of my old favorites. Read all about the process and design details or get down to business by scrolling down to the in-depth free pattern below.
The Design
When I was planning my lineup of crochet projects I wanted to design for the summer season, I knew I wanted to make a large scale garment to anchor all of the “lighter” pieces I made – like the June Sun Hat and the Little Lamb Lovey. The Penelope Dress was my big kahuna!
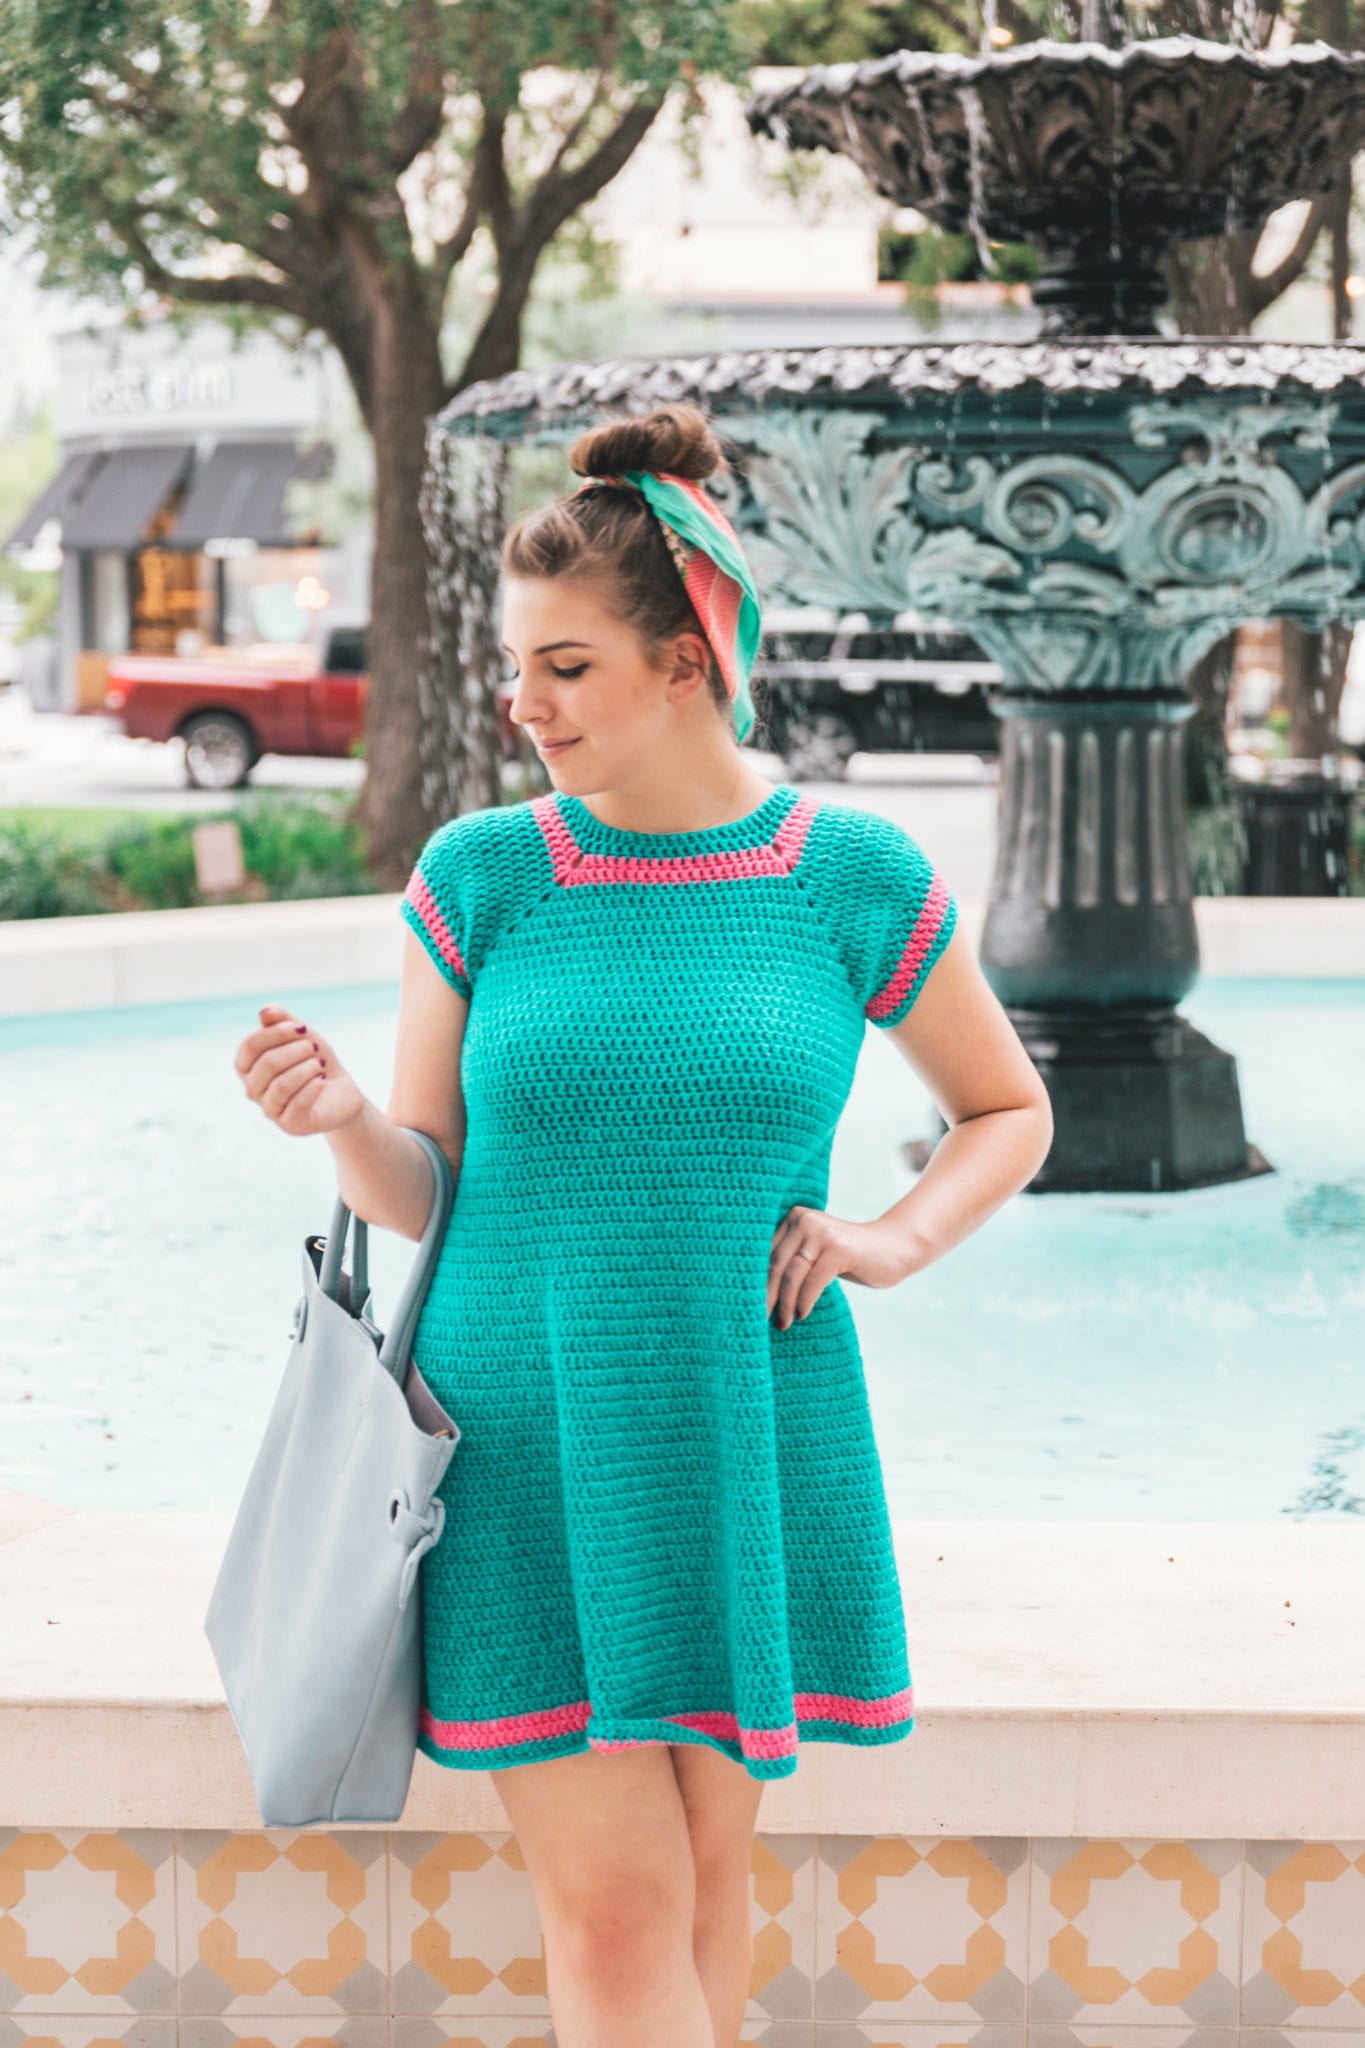
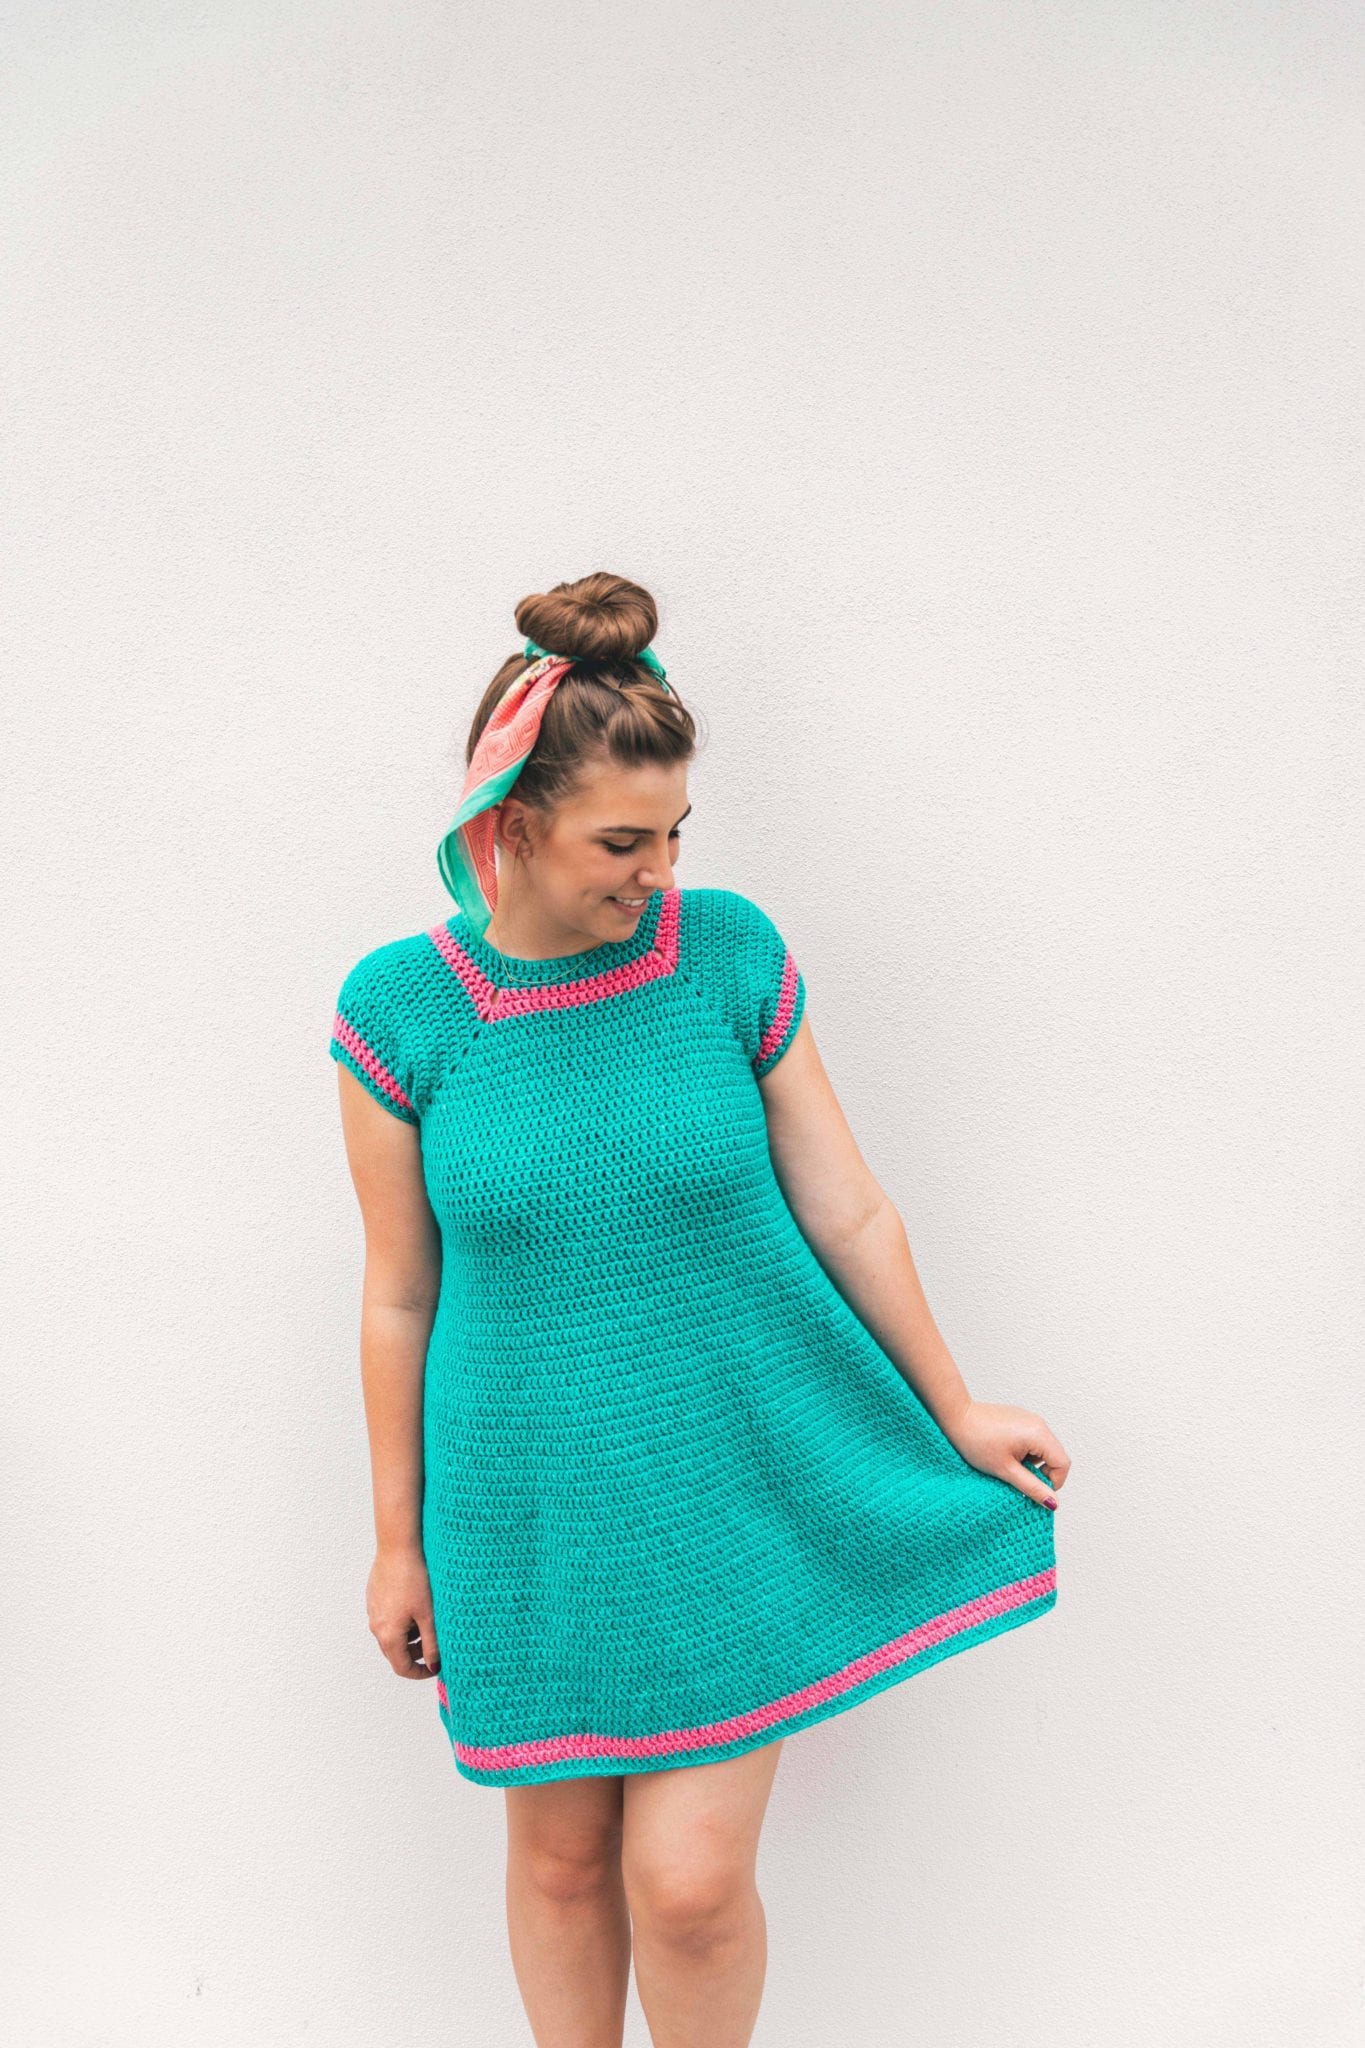
I knew I wanted to make a dress but there are SO many summer dress styles out there, I had to narrow down what I wanted in the shape. I knew I wanted it to be flowy with great drape (more on that later!) but not too loose that felt like a potato sack. I settled on the decision that the top would be fitted and flare into a circle skirt.
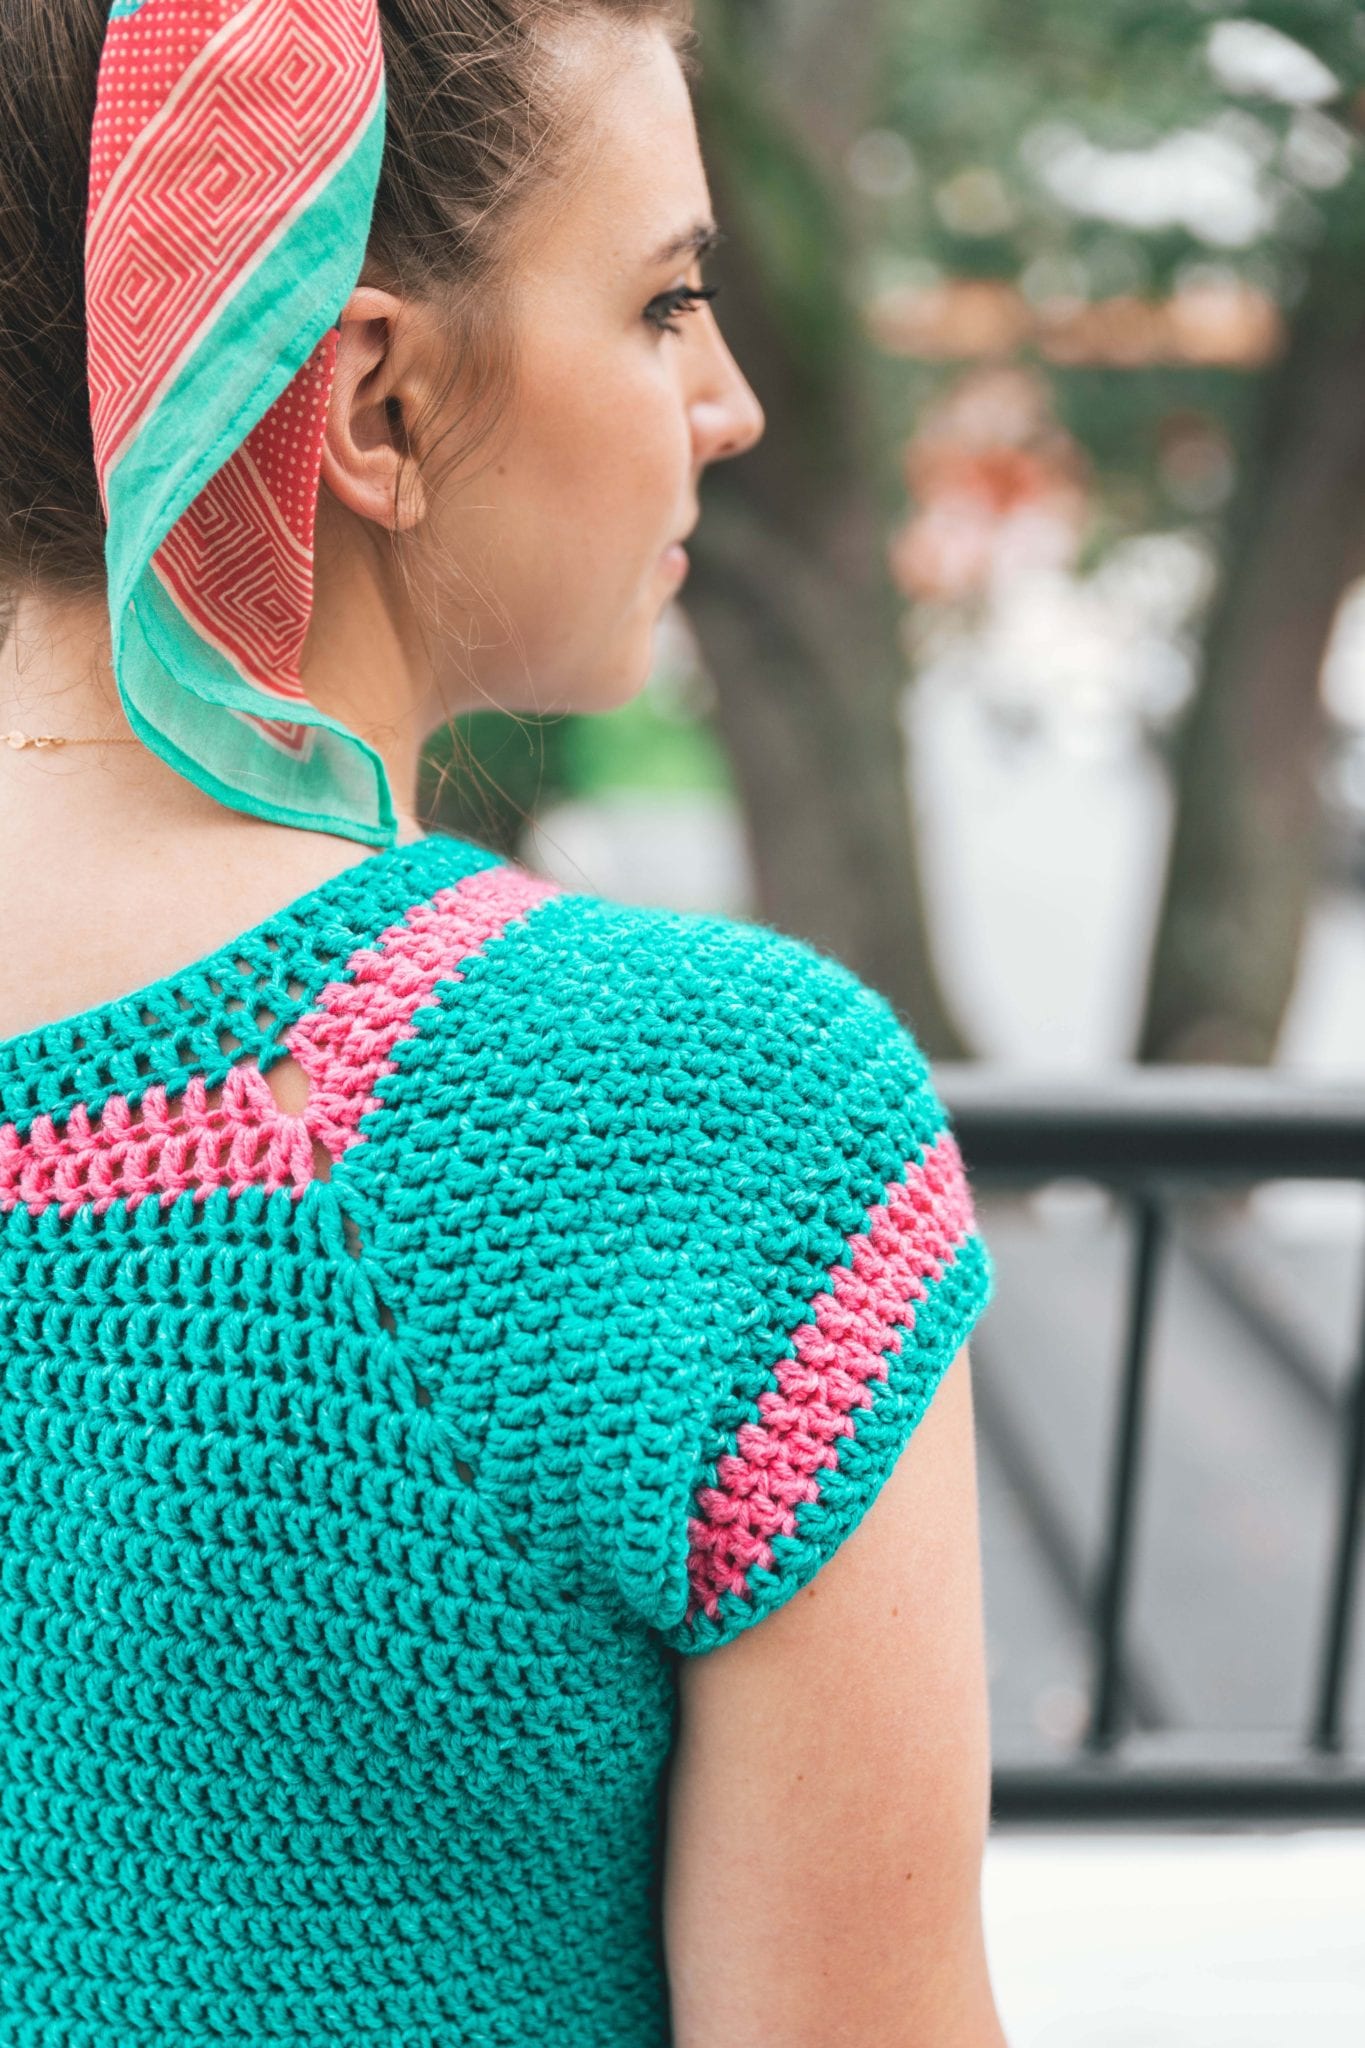
Now, how about that neckline? You may know I have a toddler, Parker, that’s just about as wild as can be. He’s sweet and energetic and keeps me on my toes! So I needed my dress to be practical for chasing him around the park while still being pretty enough for lunch with the girls. I knew I didn’t want to make a dress with a plunging neckline or even tank style straps as it’s just not super practical for my lifestyle. Also – the flared skirt would mean more crochet fabric and thus more weight on the neckline/shoulder area – I needed something substantial to compensate. I took a big, deep breath and wrote down “raglan style bodice” in my design notebook. Eek!
It took a good bit of trial and error but I’m SO happy with how the raglan neckline moves into the sleeve split and keeps the entire upper bodice fitted. It’s actually so much easier to crochet a raglan style top than I ever thought! (Don’t worry, all of my experimentation was working out the perfect math to nail that fit). Really if you can work in the round you can make a raglan style garment, it really is that simple!
SUMMER PATTERNS I LOVE (& you should too)

1. Crochet Ava Poncho / 2. Crochet Weekender Tunic / 3. Crochet June Sun Hat
The Yarn
There are so many great yarn options out there right now, it was hard to decide on what yarn to use for my Penelope Dress! I knew I needed the yarn to drape like a dream – that was imperative! Without great drape, this dress would be stiff, uncomfortable, and not give me that movement in the skirt that was kinda the whole point of this dress. I also needed some great color options for my fun summer garment.
I ended up loving one of Lion Brand Yarn’s classics with a twist – the new extension of ever popular Jeans, Jeans Colors! This new line has all the perfect drape, softness, and heathered look as the original line of denim-inspired Jeans yarn but with bright new colors! I chose to make my dress with the color Capri and accent with Bermuda Shorts – these two bold hues are gorgeous together for a bright step outside my closet comfort zone!
Lion Brand has even made this Dress into a kit on their website! You can choose between my bold and bright color option or a more subtle neutral color option. Both come with a printed copy of the full pattern below and all the yarn you need for your size. Shop the kit here!
Now, let’s talk substitution.
There are lots of yarns that can sub in for Jeans Colors here, like the original Jeans line of yarn that comes in all the best denim hues. Lion Brand also just released a new line of Jeans Cotton yarn which would be perfect for this dress too! If you wanted to go ultra summery you could even use Lion Brand’s Flikka or the all new Coboo yarn (I can’t wait to design something with that one!). So many great options, just make sure when you substitute yarn to adjust your hook size to meet my gauge measurements in the pattern below or your dress might not fit as intended!
So much help below
I made sure to include not just the written instructions for this dress, but step by step photo assistance, a sizing schematic to help you visualize the finished dress, and a stitch chart for the yoke of your dress. These extra tools are there to help you through this pattern, being that it’s a bit more advanced so I hope they come in handy!
If you’d like an easy printed version of the pattern with all the extra resources, please check out the inexpensive pattern PDF by clicking here.
PATTERN
- Get the ad-free, large print, printable PDF pattern HERE.
- Grab the Ultimate Pattern Bundle that includes 150+ patterns just like this one on sale for $20 today HERE.
- PIN this pattern to your Pinterest boards for later HERE.
- Add this pattern to your Ravelry queue HERE.
To sum it up:
The Crochet Penelope Dress is a simple A-line silhouette with easy double crochets throughout. It’s an approachable garment for making with a fitted yoke and flared skirt for easy summer wear. I used a contrast color of Jeans Colors yarn for a little flair with simple stripes to give this beginner garment a polished look.
Materials:
–Lion Brand Jeans Colors yarn (Weight: 4/Medium – 3.5oz, 246 yds)
Main Color: Capri – 4 (5, 5, 6, 7, 7, 8) skeins (approx. 400, 450, 500, 560, 610, 680, 730 g)
Accent Color: Bermuda Shorts – 1 skein (approx. 30, 35, 40, 45, 50, 60, 70 g)
–Size I/9 5.5 mm hook or size needed to get gauge
–Measuring tape or ruler
(Click HERE to shop all my favorite tools!)
Sizes:
XS, S, M, L, XL, 2XL, 3XL
Bust: 31” (XS), 35” (S), 38″ (M), 42” (L), 46” (XL), 50” (2XL), 53” (3XL)
Width at hemline: 24” (XS), 27” (S), 30 ″ (M), 33.5” (L), 36” (XL), 39” (2XL), 42” (3XL)
Length (underarm to hemline): 23” (XS) 23.5” (S) 23.5″ (M) 24.5” (L) 24.5” (XL) 25” (2XL) 25” (3XL)
Armhole (before stitching sleeve): 5” (XS), 6” (S), 6.5″ (M), 7” (L), 8” (XL), 8.5” (2XL), 9” (3XL)
Sleeve Length: 2.5”
Abbreviations (US terms):
ch – chain
sc – single crochet
dc – double crochet
inc – increase
dec – decrease
rpt – repeat
sl st – slip stitch
sk – skip
st(s) – stitch(es)
yo – yarn over
Special Stitches:
Dc inc – 2 double crochet in one stitch
Dc Dec – yo, insert your hook in first st, yo, pull up a loop, yo, pull through 2 loops, yo, insert your hook in the second st, yo, pull up a loop, yo, pull through 2 loops, yo, pull through last 3 loops
Skill Level: Level 3 Intermediate
Notes:
-This dress fits true to size. For reference, model is 5’5” tall with a 38” bust and wearing the Penelope Dress in size Medium. If you are between sizes, please size up.
-Sizing listed in the pattern will be in X-Small with Small, Medium, Large, X-Large, 2X-Large, and 3X-Large listed in parenthesis such as 36 (41, 46, 51, 56, 61, 66) whereas Ch 36 for size X-Small, 41 for size Small, 46 for size Medium, 51 for size Large, 56 for size X-Large, 61 for size 2X-Large and 66 for size 3X-Large. When only one number is given, it applies to all sizes. To follow pattern more easily, circle/highlight all numbers pertaining to your size before beginning.
-Pattern is worked in a top-down yoke method, but don’t let that scare you. We will just crochet in the round to complete the neckline, leave spaces for armholes, and continue in the round to make the body. Rejoin yarn to the armholes and work the cap sleeve with easy shaping.
-Ch 2 at the end of each round and at corners of yoke does not count as a stitch.
Gauge:
13 sts x 9 rows in dc = 4”
Crochet Penelope Dress
Round 1: With main color, Ch 52 (60, 68, 76, 84, 92, 100), sl st to first Ch (next to slip knot) to form a ring, Ch 2. (52, (60, 68, 76, 84, 92, 100)
*Smaller sizes may have trouble getting the foundation Chain over your head. You can substitute foundation Dcs for a stretchier neckline.
Round 2: Dc in each ch st around, sl st to join, Ch 2.
Round 3: Dc in next 6 (7, 8, 9, 10, 11, 12) Dc, *2 Dc in next Dc, Ch 2, (sk no sts), 2 Dc in next Dc, Dc in next 11 (13, 15, 17, 19, 21, 23) Dc; rpt from * 2 more times, 2 Dc in next Dc, Ch 2, (sk no sts), 2 Dc in next Dc, Dc in next 5 (6, 7, 8, 9, 10, 11) Dc, sl st to join, Ch 2. 60 (68, 76, 84, 92, 100, 108)
Round 4: Dc in each Dc to first Ch 2 space, *(2 Dc, Ch 2, 2 Dc) into Ch 2 space, Dc in each Dc to next Ch 2 space; rpt from * 2 more times, (2 Dc, Ch 2, 2 Dc) into Ch 2 space, Dc in each Dc to end, sl st to join, Ch 2. 76 (84, 92, 100, 108, 116, 124)
Continue repeating Rnd 4 until you finish Rnd 10 (11, 12, 13, 14, 15, 16). 172 (196, 220, 244, 268, 292, 316)
Now we will divide the yoke for the body and sleeves in our next Round.
Dividing Round: Dc in each Dc to first Ch 2 space, 2 Dc into Ch 2 space, Ch 3, sk 43 (49, 55, 61, 67, 73, 79) Dc to next Ch 2 space, 2 Dc in next Ch 2 space (first armhole now completed)
Dc in next 43 (49, 55, 61, 67, 73, 79) sts to next Ch 2 space, 2 Dc into Ch 2 space, Ch 3, sk 43 (49, 55, 61, 67, 73, 79) Dc to next Ch 2 space, 2 Dc in last Ch 2 space (second armhole now completed),
Dc in each Dc to end, sl st to join, Ch 2. 94 (106, 118, 130, 142, 154, 166)
Body:
*For remainder of body work in continuous rounds. Place a stitch marker in the first st of the round and move it down after each round to keep your place.
Round 1: Dc in each Dc around, Dc once into each Ch st at each underarm. 100 ( 112, 124, 136, 148, 160, 172)
Rounds 2-9: Dc in each Dc around.
Round 10: *Dc in next 7 sts, Dc Inc; rpt from * around, Dc in all remaining sts to end. 112 (126, 139, 153, 166, 180, 193)
Rounds 11-14: Dc in each Dc around.
Round 15: *Dc in next 7 sts, Dc Inc; rpt from * around, Dc in all remaining sts to end. 126 (141, 156, 172, 186, 202, 217)
Rounds 16-19: Dc in each Dc around.
Round 20: *Dc in next 7 sts, Dc Inc; rpt from * around, Dc in all remaining sts to end. 141 (158, 175, 193, 209, 227, 244)
Rounds 21-24: Dc in each Dc around.
Round 25: *Dc in next 7 sts, Dc Inc; rpt from * around, Dc in all remaining sts to end. 158 (177, 196, 217, 235, 255, 274)
Rounds 26-47 (49, 49, 51, 51, 53, 53): Dc in each Dc around.
If you’d like to make your dress longer, simply add more rounds before your hemline stripe.
Hemline Stripe:
Color change to Accent Color as follows:
Round 48 (50, 50, 52, 52, 54, 54): With Main Color Dc in next st, Hdc in next st, Sc in next st, Sl st in next st, with Accent Color Sl st in next st, Sc in next st, Hdc in next st, Dc in next st
Continuing with Accent Color, Dc in remaining sts of the Round.
Round 49 (51, 51, 53, 53, 55, 55): Dc in each st around.
Change color to Main Color as follows:
Round 50 (52, 52, 54, 54, 56, 56): With Accent Color Dc in next st, Hdc in next st, Sc in next st, Sl st in next st, switching to Main Color Sl st in next st, Sc in next st, Hdc in next st, Dc in next st
Continuing with Main Color, Dc in remaining sts of the Round.
Round 51 (53, 53, 55, 55, 57, 57): Sc in each st around.
Finish off, weave in all ends.
Sleeves:
Join Main Color yarn to 2 Dc at yoke corner positioned near the underarm.
Round 1: Ch 2, work 7 Dc evenly across rough edges of corner stitches and underarm Ch 3, Dc in each unworked st on the yoke diving round around, sl st to join, Ch 2. 50 (56, 62, 68, 74, 80, 86)
Round 2: *Dc Dec, Dc in next st; rpt from * around to last 2 sts, Dc in remaining sts, sl st to join, Ch 2. (34, 38, 42, 46, 50, 54, 58)
Round 3: Dc in each Dc around, sl st to join.
Change to Accent Color, Ch 2
Round 4: Dc in each Dc around, sl st to join, Ch 2.
Round 5: Dc in each Dc around, sl st to join.
Change to Main Color, Ch 2
Round 6: Dc in each Dc around, sl st to join, Ch 1.
Round 7: Sc in each Dc around, sl st to join.
Finish off, weave in ends.
Repeat sleeve on other side.
Earning a Living with my Handmade Home
If you love crocheting and knitting, you should think about starting a blog! I’ll help you get started to turn your hobby into a money-making career with my free “Start a Blog” guide.
Or you can check out my latest income report to see how this blog earned over $10,000 last month!
Um omg yes please! Adding this to my queue right now! 🙂 now the big question. Which Jean color shall I choose hmmm
Lovely dress and very doable I think. Thanks for the free pattern. ????
This is absolutely gorgeous!! So feminine and stylish. Please make this in little girl sizes, please! Also, please sell your patterns on Ravelry. Thank you for sharing your creativity and time with us. You are amazing!!
This is too cute! How do you think it would work up in lion brand mandala? would it have good drape? i have never used it thank you
Just two words… LOVE IT! Definitely going on my To Make list
Can’t wait to complete this pattern.
I am working on the gauge and I can’t seem to get the rows correct. I end up with 7 rows to = 4” not the 9 as in the pattern. Sts are correct at 13. Though. Any suggestions?
Maybe I’m missing it, but at what row do you start the secondary color in the beginning? Row 3 or 4?
Thank you! 🙂