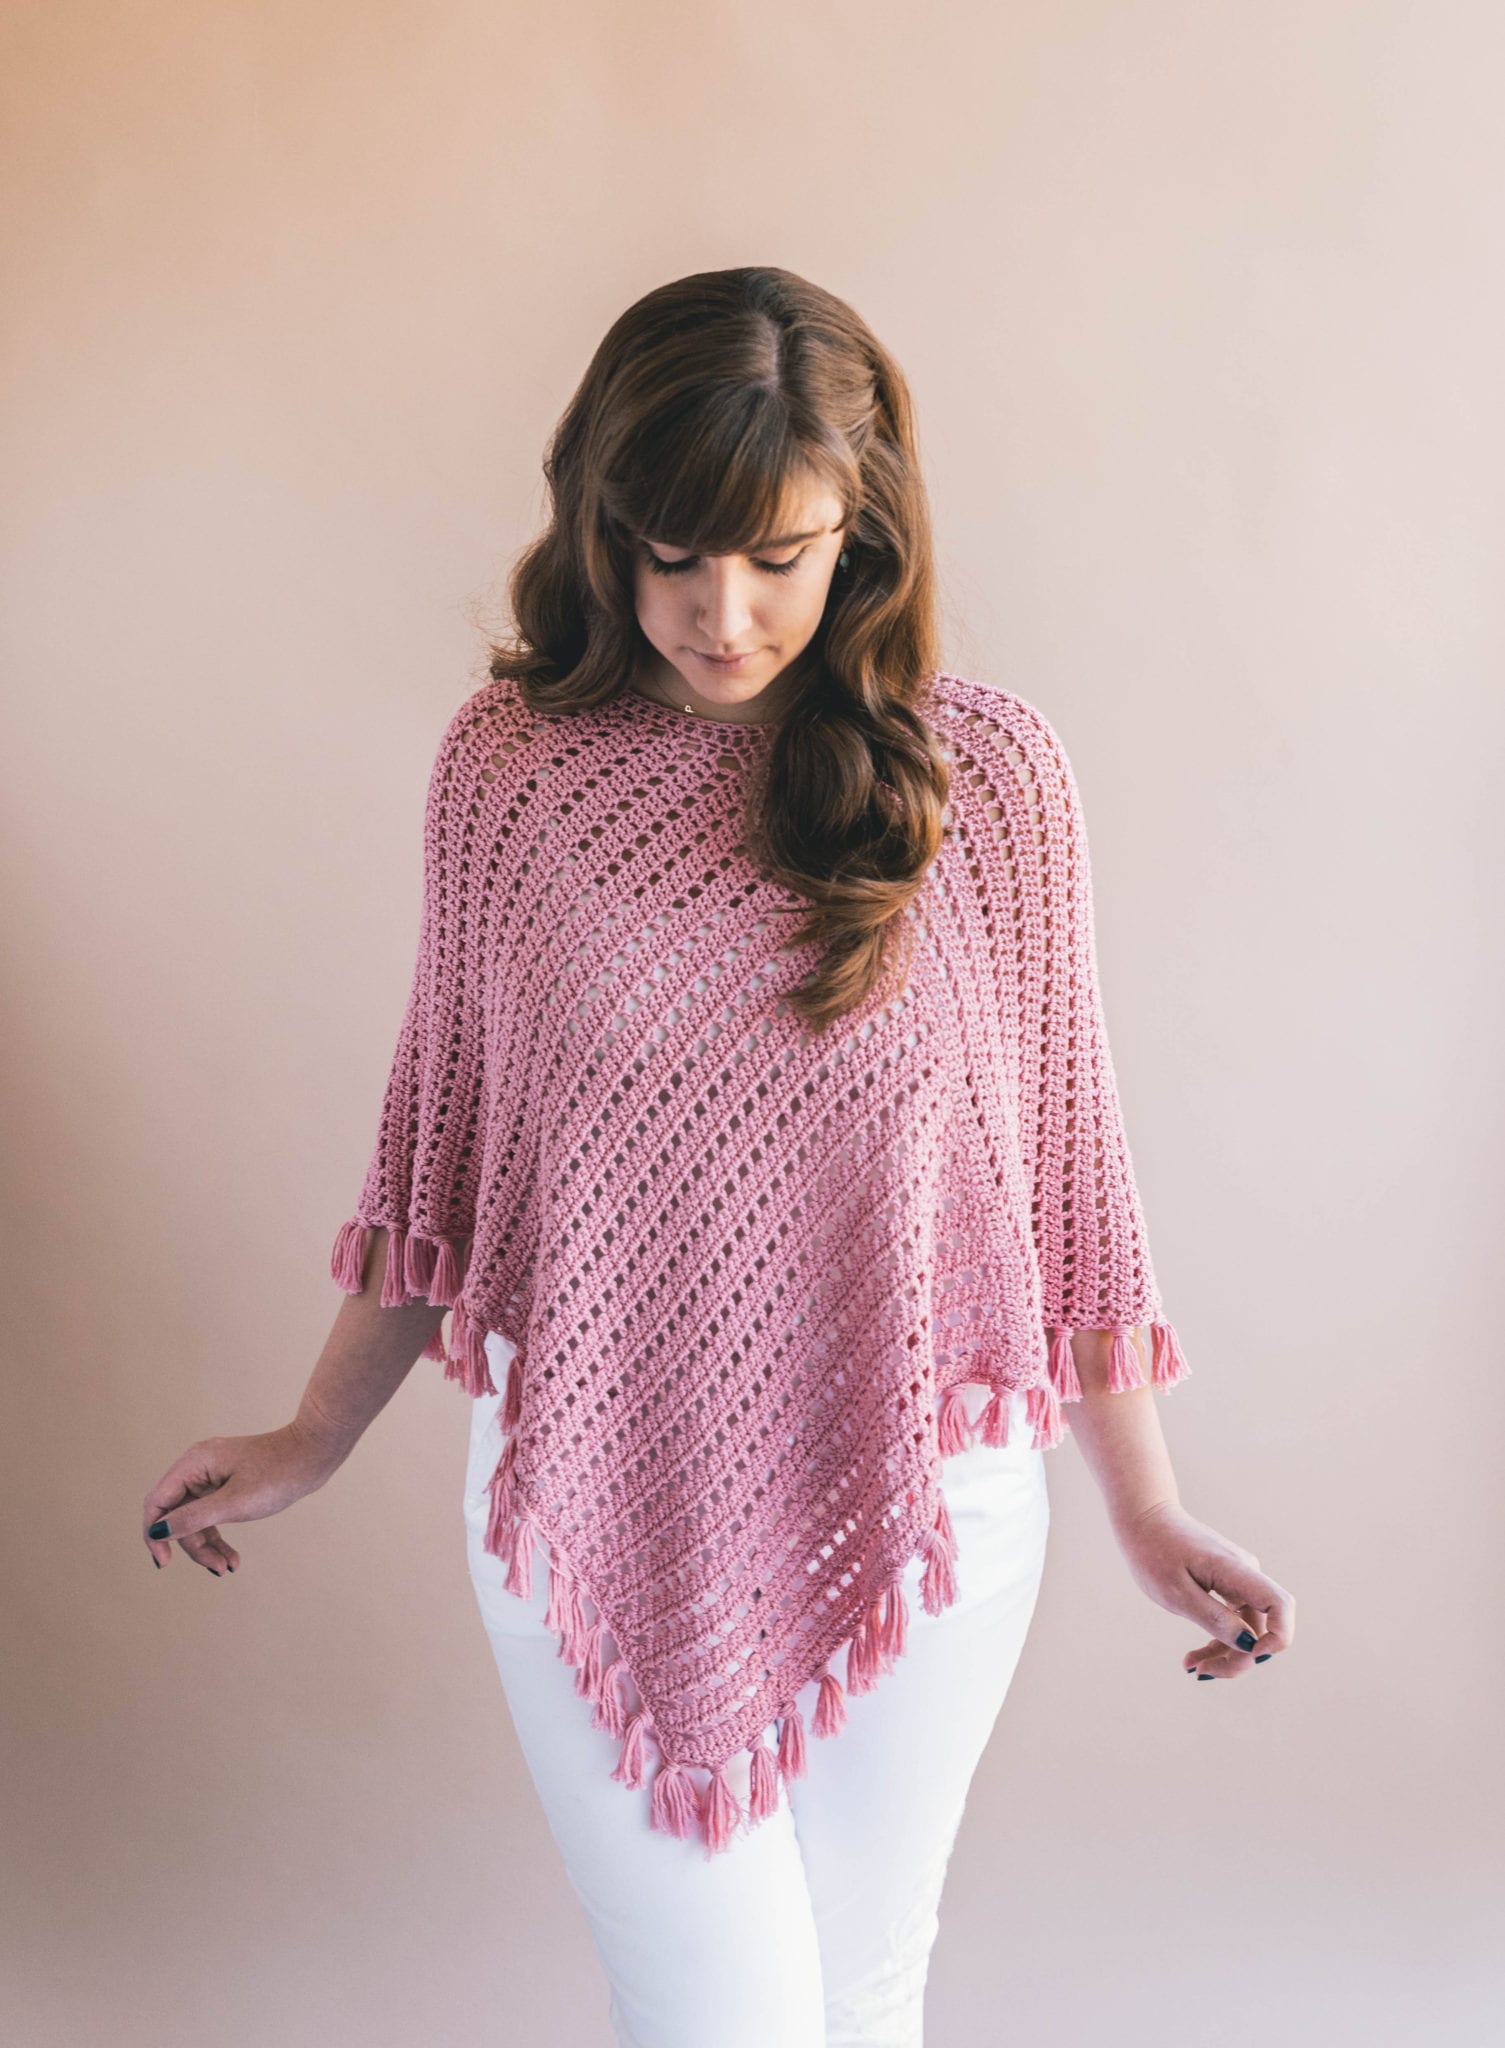
I am so excited to share with you guys my latest wearable – the Ava Fringed Poncho!
It’s delicate and pretty with a flowy romantic feel, while being so super easy to make – even for brand new crochet beginners.
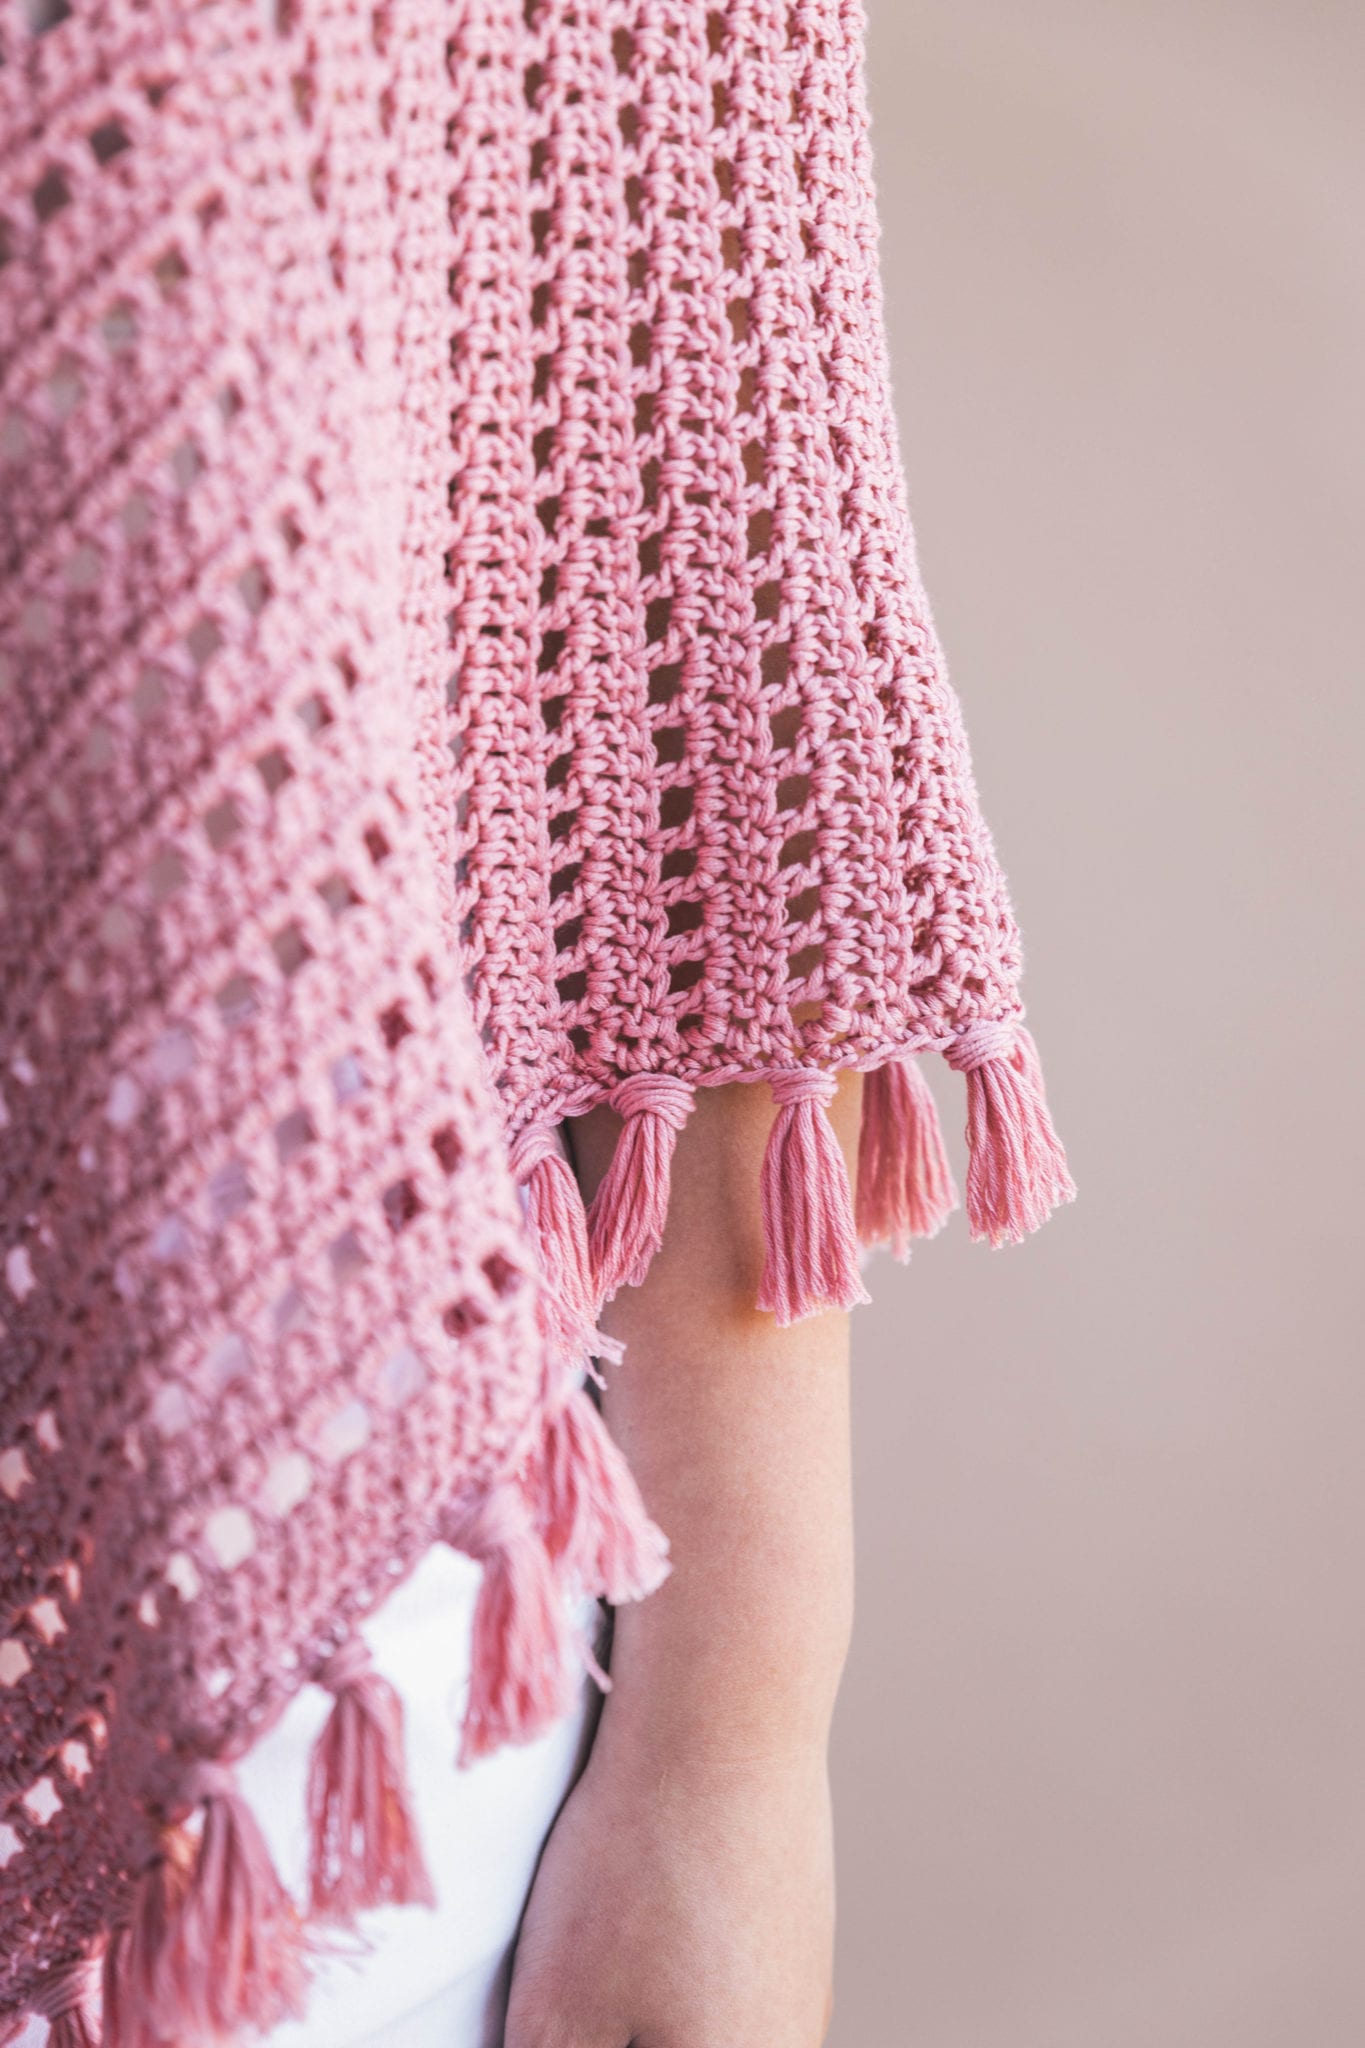
And have you seen that tassel style fringe?! It’s the perfect mix of bohemian comfort and chic, fashion forward style.
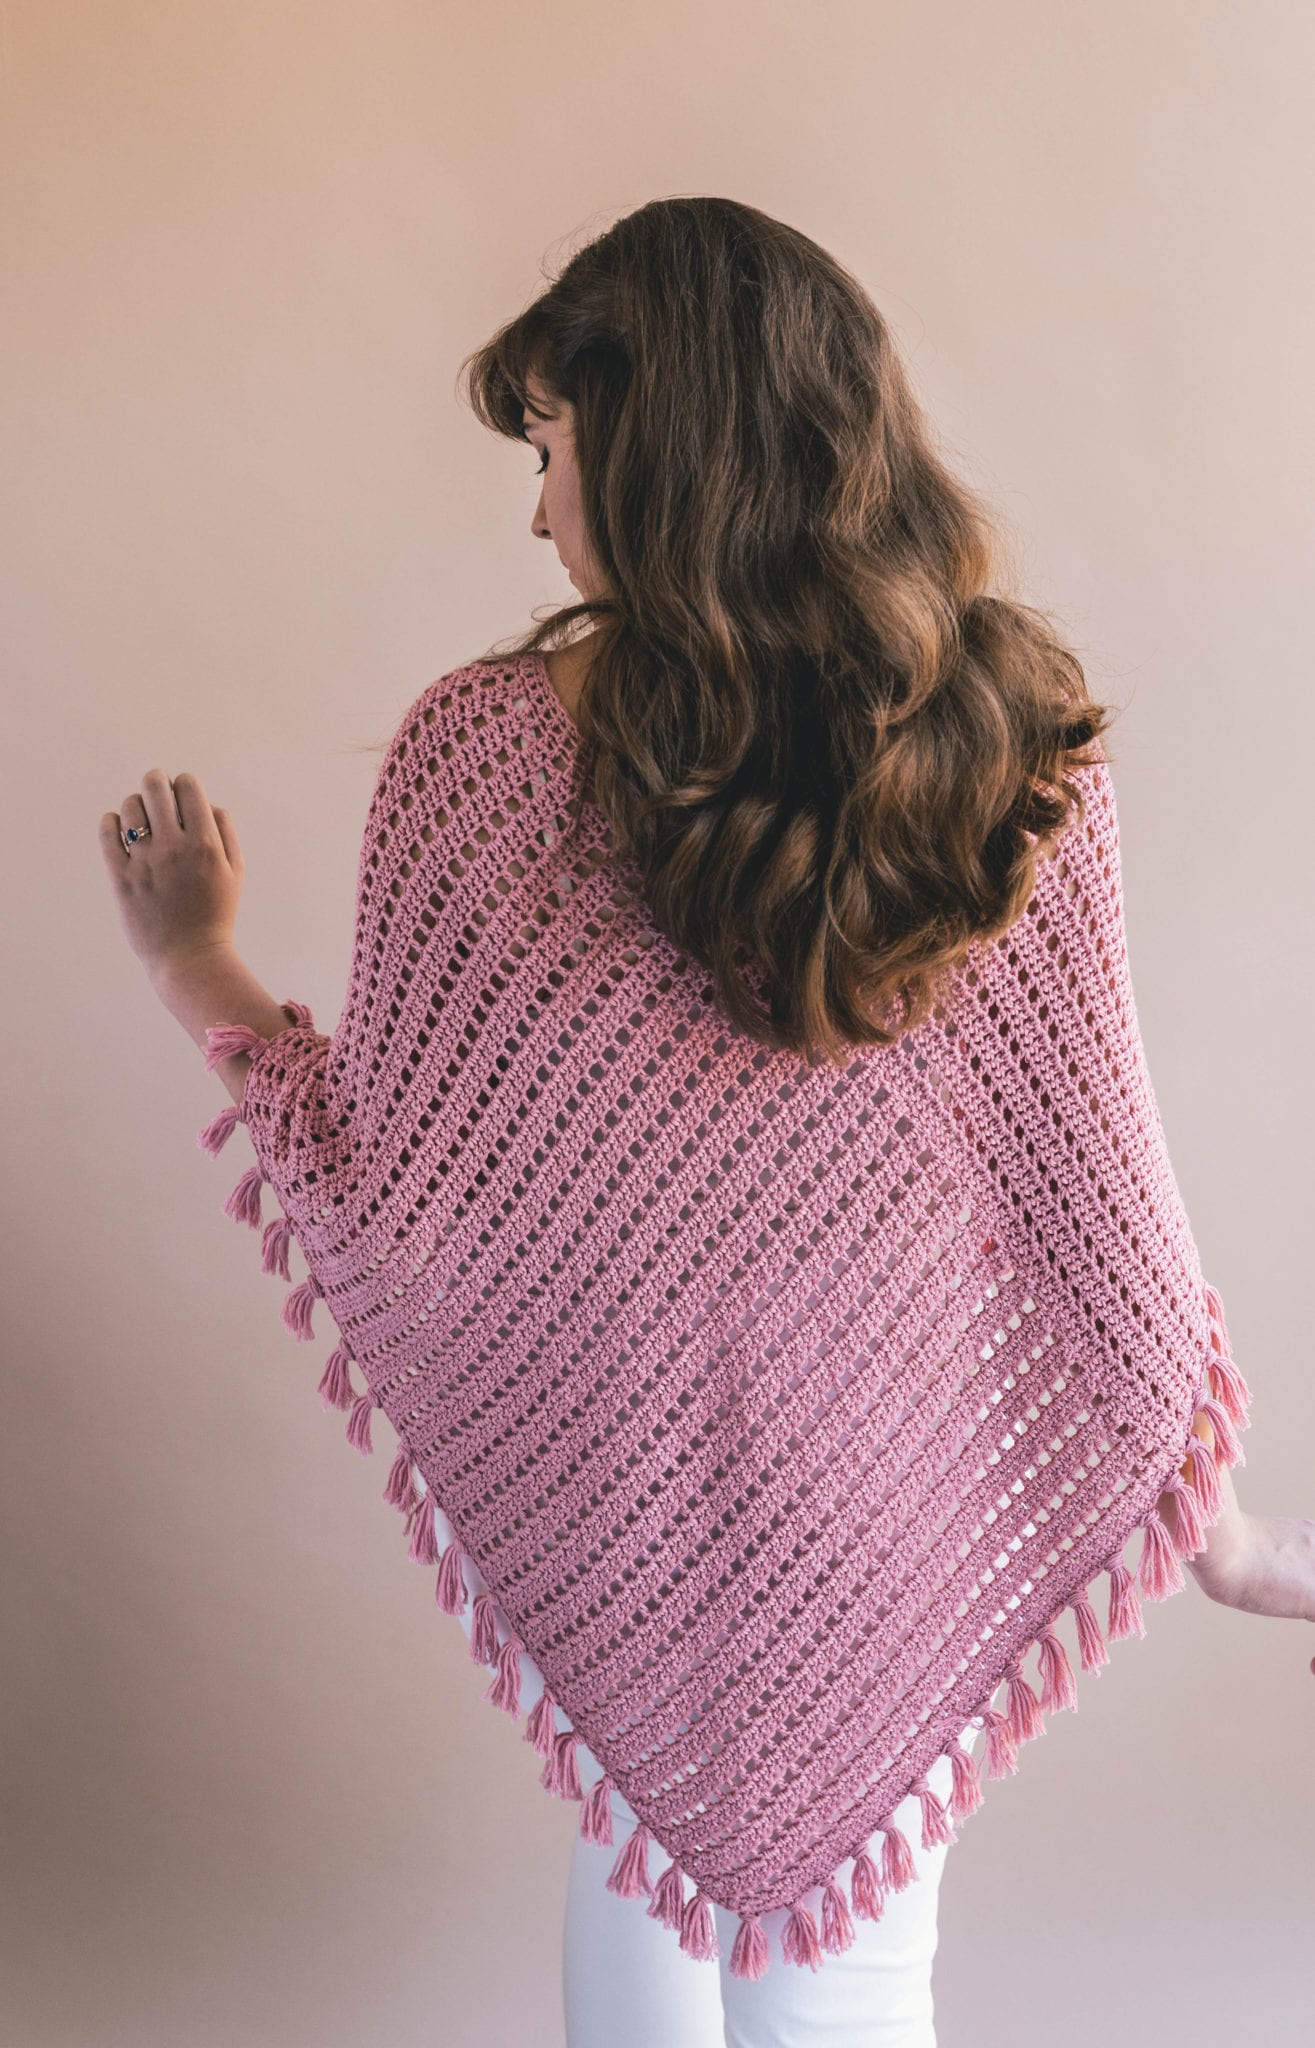
You won’t believe how easy this pattern comes together – it’s made of only 2 large rectangles that you sew together in a surprising way, add some neckline and hemline edging, plus tassel fringe and you’re done!
Even if you’re still a crochet beginner, don’t be afraid. If you can make a scarf or a blanket, you can make this!

I chose to use Lion Brand Yarn’s LB Collection Cotton Bamboo – yarn that I haven’t designed with before! It’s such a beautiful, soft, lightweight yarn that feels super luxurious. You know how some lightweight yarns also feel really cheap? Well these skeins feel like silky fibers you’d find in an indie yarn shop for about triple the price.
That’s one of the things about the LB Collection – it’s exclusively sold at LionBrand.com so that LB can offer luxury grade yarns at an affordable price by selling direct to the consumer. This way we have direct access to some incredible yarns for decent prices! Yay!
I don’t think this will be the last project I crochet with Cotton Bamboo, it’s so perfect for those warmer months and feels plushy soft right off the hook!
Lion Brand Yarn has created a kit with all the yarn you need to make this poncho in your chosen size as well as a free copy of the printed pattern over on their website here!
You’ll get all the instruction below printed and ready to make in your choice of the Cherry Blossom color I used or another stunning Cotton Bamboo color called Hyacinth shipped right to your door. At no extra cost to you, please shop through my affiliate link HERE! It gives me a little commission and helps support this blog and its free patterns. Thanks!
PATTERNS I LOVE (& you should too)
1. Crochet Homemaker Gingham Throw / 2. Crochet Everyday Cardigan / 3. Crochet Le Nuage Wrap/Triangle Scarf
Check out the video tutorial below where I teach the Medium/Large size cardigan start to finish – it’ll help ya no matter what size you’re making!
PATTERN
- Get the ad-free, large print, printable PDF pattern HERE.
- Grab the Ultimate Pattern Bundle that includes 150+ patterns just like this one on sale for $20 today HERE.
- PIN this pattern to your Pinterest boards for later HERE.
- Add this pattern to your Ravelry queue HERE.
To sum it up:
The Lace Fringe Poncho is the perfect topper to any outfit. It’s lightweight enough to keep you breezy in the warmer months, and a wonderful layering piece over sweaters when it gets chilly outside. The easier than ever 2 rectangle construction means even a brand new crocheter can make it & the unique assembly style is a fun surprise!
Materials:
–Lion Brand Yarn Cotton Bamboo in Cherry Blossom (XS/S: 4 skeins, M/L: 4 skeins, XL/XXL: 5 skeins, XXXL/XXXXL: 6 skeins)
Grab the kit from Lion Brand with all the yarn you need and a printed copy of the pattern HERE!
(Click HERE to shop all my favorite tools & materials!)
Gauge:
17 Dc = 4″
9 rows = 4″
Sizing:
Bust: 30″ (XS) 34″ (S) 38″ (M) 42 ” (L) 46″ (XL) 50″ (XXL) 54″ (XXXL)
Width across back: 20″ (XS) 21″ (S) 22″ (M) 23″ (L) 24″ (XL) 25″ (XXL) 26″ (XXXL)
Length: 24″ (XS) 25″ (S) 26″ (M) 26.5″ (L) 27″ (XL) 27.5″ (XXL) 27.5″ (XXXL)
Armhole: 6″ (XS) 7″ (S) 7.5″ (M) 8″ (L) 8.5″ (XL) 9″ (XXL) 9.5″ (XXXL)
Sleeve Length: 4.5″ (XS) 5″ (S) 5″ (M) 5.5″ (L) 5.5″ (XL) 6″ (XXL) 6″ (XXXL)
Abbreviations:
ch – chain
sc – single crochet
dc – double crochet
sk – skip
st(s) – stitch(es)
rep – repeat
t – turn
Difficulty Level:
Level 1 – Beginner
Pattern & Sizing Notes:
-For reference, model is 5’5” tall with a 39″ bust, and wearing the Lace Fringe Poncho in a size Medium/Large.
-Sizing listed in the pattern will be in X-Small/Small, Medium/Large, Xl/2X, and 3X/4X listed in parenthesis such as 36 “(41, 46, 51)” whereas Ch 36 for size XS/S, 41 for size M/L, 46 for size L/XL, and 51 for size 2XL/3XL. When only one number is given, it applies to all sizes. To follow pattern more easily, circle/highlight all numbers pertaining to your size before beginning.
-This cardigan is worked in 2 rectangular panels then seamed together. Neckline is worked directly onto the sewn pieces. Hemline border is worked directly onto the sewn pieces and tassel style fringe is added last.
-All sizing is slightly oversized and based on the CYC sizing regulations. Use this guide or the measurements above to determine what size range you fall into. If you want a more figure-hugging fit, size down.
-Ch 2/3 does not count as a st throughout.
Poncho
Panels:
*make 2
Ch 65 (69, 73, 77)
Row 1: Dc in 4th from hook and each across (62, 66, 70, 74)
Row 2: Ch 3, t, sk 1 st, Dc in next st, *Ch 1, sk 1 st, Dc in next st, rep from * in each st across (62, 66, 70, 74)
Row 3: Ch 2, t, Dc in each st across (including Ch 1 spaces) (62, 66, 70, 74)
Repeat Rows 2-3 until you’ve reached Row 67 (69, 71, 73)
Each rectangle should measure close to the sizing listed below (remember – if you have slight variance, it won’t matter too much in the long run).
XS/S: 14 x 28”
M/L: 15 x 30”
XL/XXL: 16 x 32”
XXXL/XXXXL: 17 x 34”
Finish off, weave ends.
Seaming:
With a long piece of spare yarn, thread your tapestry needle.
Place one panel lengthwise (first panel) and the other widthwise (second panel). You should have one panel’s short side matching up with another panel’s long side, making a giant “L” shape.
Use a mattress stitch to seam your panels together. Sew through tops of the stitches on one panel and through the ends of the rows on the other panel.
Weave ends.
To create the second seam, fold first panel in to meet your first seam. Fold your second panel in to meet the end of the other panel. You should have a giant heart shape.
Use a mattress stitch to seam your panels together again long the first panel’s short side and your second panel’s rough edge.
Weave ends.
Neckline:
Identify the neckline area (smaller opening at the top of your seamed panels). Decide which side will be your front and back.
Join yarn to the center of the neckline back, Ch 2
Round 1: Dc in each st evenly around (I worked 1 stitch into the end of each Row – you’ll have a little tightening but that’s good), sl st to join
Round 2: Ch 2, Dc in each st around, sl st to join
Round 3: Ch 1, Sc in each st around, sl st to join, finish off
Weave ends.
Hemline Edging:
With the right side of the cardigan facing you, join yarn to any corner of the hemline
Round 1: Ch 1, Sc in each st around the entire hemline evenly, work 3 Sc into each corner, sl st to join
Round 2: Ch 1, Sc in each st around, sl st to join, finish off
Weave ends.
Fringe:
Cut pieces of yarn about 7 in. long (6 per tassel fringe unit).
Fold 6 pieces in half together. Use your crochet hook to pull the fold of the yarn partially through any stitch along the hemline edging. Pull tails of the fringe through the loop created. Tighten and trim tails.
Skip 3 sts along hemline edging.
Repeat tassel style fringe units until you’ve lined the entire hemline of the poncho.
Trim all fringe to be as even as possible.
Pop your brand new Crochet Lace Fringe Poncho on and head out of here – you’re done!
Earning a Living with my Handmade Home
If you love crocheting and knitting, you should think about starting a blog! I’ll help you get started to turn your hobby into a money-making career with my free “Start a Blog” guide.
Or you can check out my latest income report to see how this blog earned over $10,000 last month!
I have not been interested in any crochet projects for months. Then this came up on my Facebook feed today! It is so beautiful and I am so excited to head to town and buy some yarn! Thank you for sharing this with us! <3
I am not a crochet person . I love to knit and normally like the knit “look” best. However, I have fallen in love with this poncho pattern. If I can make my poncho look like your poncho you will hear hallelujah even on the moon.
Thank you for your excellent video. Let’s see if this old dog can learn some new tricks.
Your partner in yarn,
Judy
the cutest Poncho I have seen
Adorable poncho , love it thanks a bunch…… Ann in arkansas
When I clicked your link to pin to Pinterest a cardigan shows up, not the poncho. Did I misunderstand?
Oh, btw, I love this pattern. That’s why I want to pin it for later. In the middle of making a c2c lapghan now. Thank you.
Should be correct now!
Me sorprendió este modelo, muy bello y práctico, me gusta mucho tejer a ganchillo y este modelo está muy lindo.
This is absolutely stunning. I am definitely making myself one this weekend. I’m always making things for everyone else but it’s my turn now. Thank you so much for sharing this pattern.
Anna
Hi Ashleigh!
So I started the first rectangle for this poncho and I’ve gotten 47 rows in at 68 stitches across and it’s measuring to be 19”X24” and I’m not sure why. Any clue as to what I may have done wrong and if I should start over?
Hmm, is your gauge on par with the pattern?
Felicitaciones,precioso trabajo!!!!.
Thank you for sharing this lovely pattern. How should I adjust the pattern if I would like the poncho to cover more of my arms and torso?
Thank you
I would make your panels wider! That will give you more coverage and width 🙂
Comment faire pour avoir le tuto en français Svp. Merci
Do you have a child’s pattern for this poncho?
Hi Ashleigh,
Beautiful poncho. I’m using all your recommended supplies (love that cotton bamboo!) but no matter how hard I try, my gauge is coming out much larger than yours. Your yarn tension appears loose when you’re demonstrating in the video but are you maybe pulling tightly? It’s not working with a J hook. Please help. I really want to make this poncho.
-Grace
Hi Grace!
You’re welcome to change the hook size if you need to get the correct gauge. I would try an I or even H hook and see if that helps ya get closer to mine. Luckily, this pattern is so flowy and loose that a slight variance shouldn’t muck up the fit too much. Thanks for checking though, let me know if you need any further help!
Thank you so much! I ended up using a size 7 hook, but it turned out the right size. It looks amazing! I will make another for my aunt. Such a lovely poncho!
Hello Ashleigh,
I’m making a poncho for my grown daughter for her birthday next month – and she likes your pattern here, but would prefer it in a wool (she works in San Francisco and is always cold). Your finished product looks so lovely in the bamboo cotton; but my question is whether you think it would work up just as well with a lightweight wool.
Thank you for sharing this pattern – I look forward to making it!
I think it could be stunning in a light wool! I would try to stick to a category 3 weight or a light 4. Lion Brand Wool Ease would work up well and be very durable going through the wash!
If i cant find the cotton bamboo yarn, can i use lion brand 100% cotton or red heart soft yarn?
Certainly! Any DK or worsted weight will work 🙂
Hey there. This poncho is so pretty. Just curious, does the yarn need to be a cotton yarn or would acrylic work too?
Acrylic would work fine! Just be a bit warmer 🙂
Can’t find this yarn. Can I use red heart soft yarn or lion brand all cotton yarn?
I have just made one for myself I love it just need to do fring. But my 5 ye old granddaughter would love one how many stitches should I do xx
Pretty poncho, but since I had clicked the link for a foot pillow it is the strangest peacock tail mandala pillow I have ever seen.
After trying to get started with the written directions and feeling it was not working out (because of not using the turning chain) , I watched your video and followed exactly what you showed and said until you said put on your 69 or however many rows and we’ll talk again. Every single row I noticed the “thing” getting narrower, but I’m not supposed to use the chains at the end, so I did not. Now I have finished row 14 and have only 58 stitches instead of 70. I noticed it looking like a trapezoid, so, though I was still following what you showed in the video I continued. I have been a crocheter for many years…I usually do not make clothing, but have made a few sweaters, scarves and hats successfully. What do you suppose went wrong? After every row I checked to make certain I did not miss a stitch and that I did the chain one between dc on the “lace” row. It has something to do with not using the turning chains…of that I’m convinced. If you have any thoughts to share, I’d appreciate it. Having purchased the yarn I am now on the search for another pattern.
Hi Connie, sorry to hear you’re having trouble. I always stitch in the very first stitch of the row right next to the turning chain (many crocheters skip this stitch and work into the turning chain at the end of the row instead) as a way of keeping straight edges. I think that may be where we stitch differently and why you’re finding accidental decreases. If that’s the way you crochet, you’d need to go ahead and stitch into that turning chain from the row below at the end of your row, otherwise you’d need to begin your rows as I do in the very first stitch. Hope this helps!
Do you think this poncho would make up well using Lion Brand Touch of Alpaca yarn?
Why after completing row 3 with 66 stiches the pattern says to continue until row 67 but it gives different number of stiches? I would expect 66. Am I wrong?
Nevermind. I misunderstood. At the end the numbers are not stiches but rows one needs to make according to their size. Sorry!