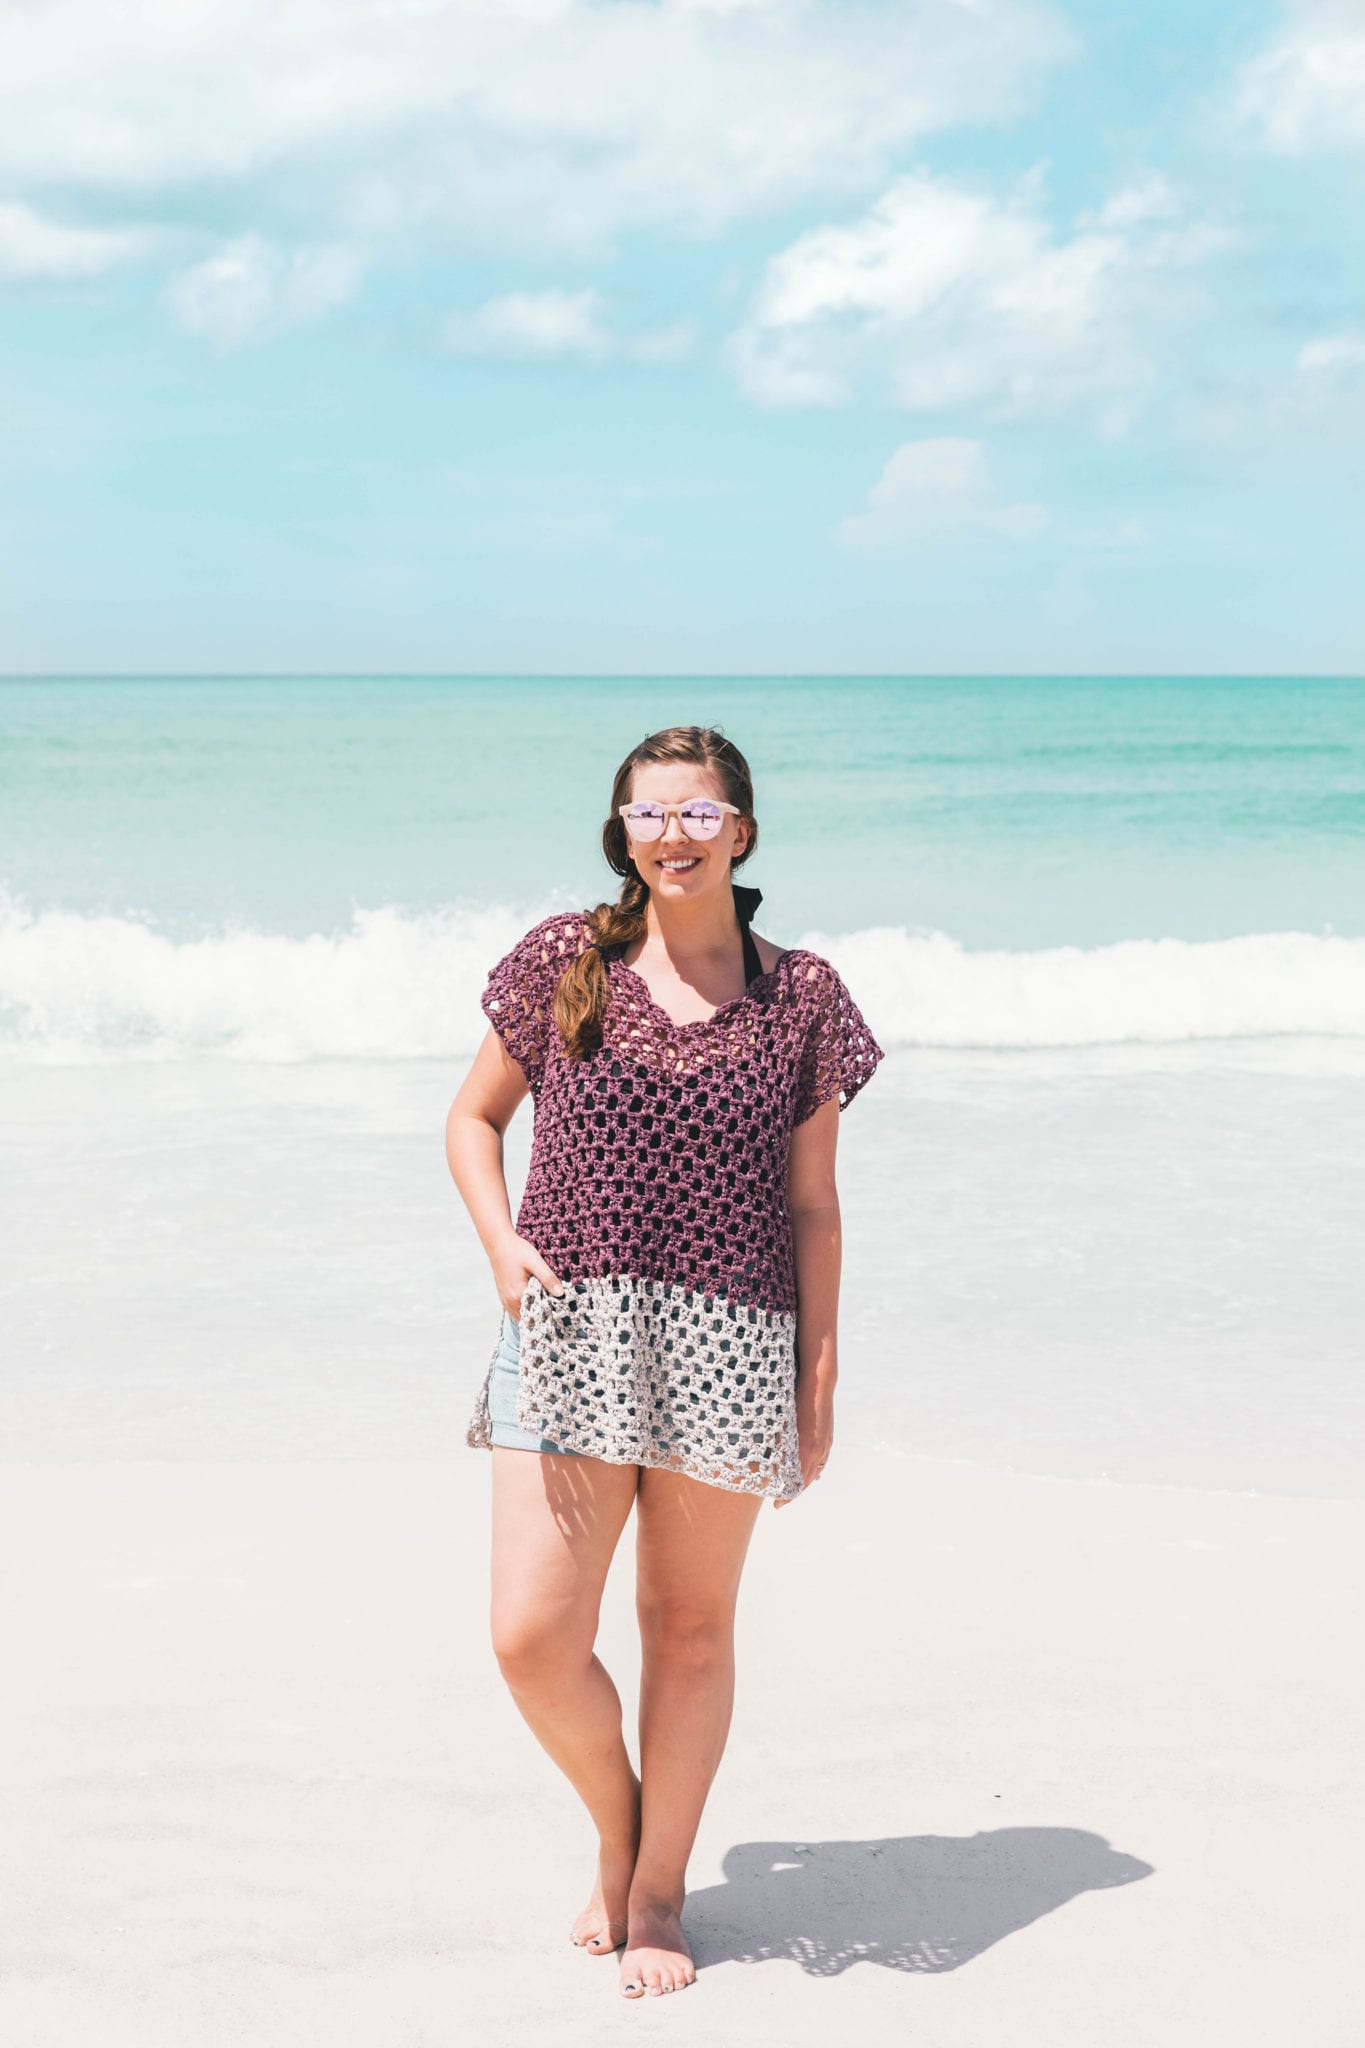
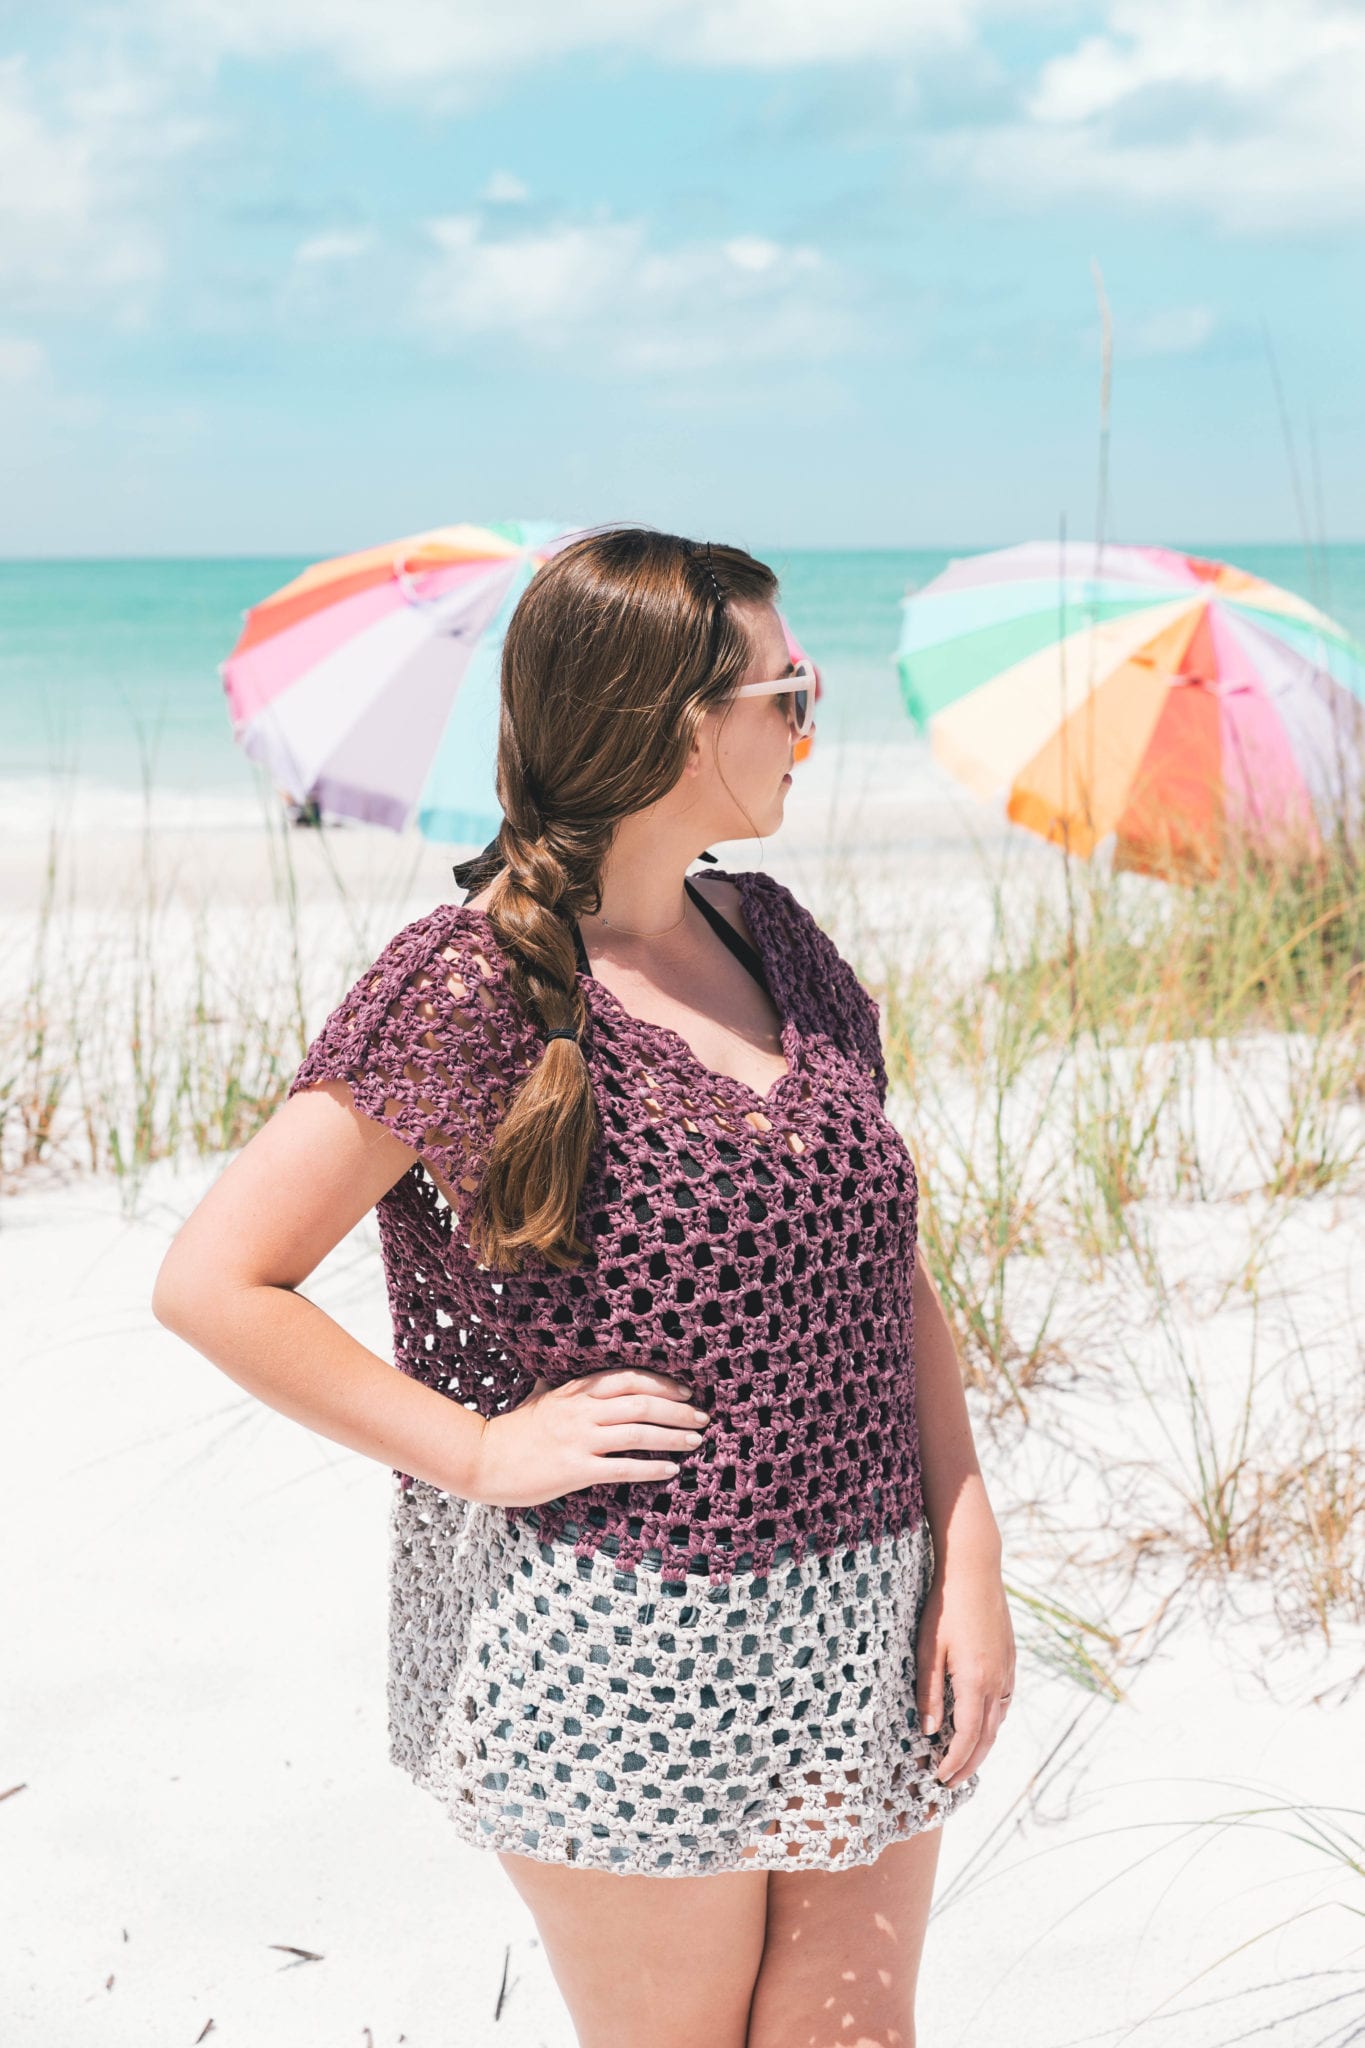
The perfect swim coverup for warm weather, the Weekender Tunic!
Wear this baby over a tank and jeans for a casual handmade look, or wear it my favorite way – as a light layer of coverage over your swimsuit! It’s super breathable and roomy, while being plenty long enough to cover your bum when getting to and from the beach house.

I’m lucky enough to live near some beautiful beaches and I love taking my two year old Parker to play on the sand, but I don’t always want to hike to and from the parking area in just my swimmer. So I needed something light to toss on over that swimsuit that would hold up well to wear, cover the necessary bits, and let the ocean air waft through it in the breeziest way – all while being stylish and cute!
The Weekender Tunic is just that – and it can be crocheted in a weekend! (Thus the name for this vacationer’s top) It consists of just simple double crochets and skipped stitches – it really is that easy! I’ve also taken care to size this pattern from XS-3XL womens, though I will tell ya this – if you’re in between sizes, size DOWN. I am wearing the Weekender Tunic in the size Medium, but I could have easily fit into a small. I wanted a long, oversized fit so I went with my true size. However you like it, you’re going to look cute in your Weekender!
PATTERNS I LOVE (& you should too)

1. Crochet Homemaker Gingham Throw / 2. Crochet Everyday Cardigan / 3. Crochet Le Nuage Wrap/Triangle Scarf
I chose to use Lion Brand’s new Rewind yarn. It’s a blend of polyester and viscose fibers which is most unusual – and totally perfect for my Weekender Tunic. (I also made my June Sun Hat out of this yarn and it’s so dreamy, find that free pattern here.)
It’s a tape style yarn, which means that the orientation of the strand is flat and skinny, like a piece of tape. It’s so hard to communicate the feel of this unique yarn with words and photos – it really is something you have to feel to believe!
The best way I can think to describe it is: really really thin velvet and wax paper had a baby. And it was Rewind yarn. It’s the most innovative fiber I’ve ever felt!
Rewind is super affordable and this tunic doesn’t take as much yarn as you’d think given all the open areas of the fabric – and those color options you guys! My favorites are the Greige and Current Situation I used here, such perfect garment and accessory colors. The Olive and Marble are favorites too! What I’m saying is: you need to go grab some of this stuff, click here to check it out!
I wanted to point out that the Weekender pattern has a couple of extra special features within the purchased PDF! If you grab the ad-free version on Etsy here, you’ll notice that there are easy to read stitch charts and stitch tables within them. Grabbing an inexpensive downloadable pattern supports this blog in huge ways and I really appreciate it – thank you!
Another great resource is the video tutorial! View it below, hope it helps ya!
PATTERN
- Get the ad-free, large print, printable PDF pattern HERE.
- Grab the Ultimate Pattern Bundle that includes 150+ patterns just like this one on sale for $20 today HERE.
- PIN this pattern to your Pinterest boards for later HERE.
- Add this pattern to your Ravelry queue HERE.
To sum it up:
The Weekender Tunic is light and breezy, the perfect topper for wearing over a swimsuit to the beach or over jeans and a tank for versatile warm weather wear. It works up in just one weekend with soft, unique Rewind yarn. It’s got plenty of breathable, roomy fabric to keep you covered and confident with easy layering. The scallop neckline adds a feminine touch to this modern color block piece.
Materials:
I used “Current Situation” as my main color and “Greige” as my contrast color
-Size L 8mm crochet hook
-Scissors
-Tapestry needle
(Click HERE to shop all my favorite tools!)
Gauge:
12 sts x 5 rows in double crochet = 4″
Dimensions:
Rectangle measurements when lying flat:
XS: 21 x 25″
S: 22 x 25″
M: 23 x 27″
L: 24 x 27″
XL: 25 x 29″
2XL: 26 x 29″
3XL: 27 x 31″
Sizing:
Total assembled width: 20″ (XS) 21″ (S) 23″ (M) 24″ (L) 25″ (XL) 26″ (XXL) 27″ (XXXL)
Total Length: 25″ (XS) 26″ (S) 27″ (M) 28″ (L) 29″ (XL) 30″ (XXL) 30″ (XXXL)
Armhole: 7″ (XS) 7.5″ (S) 8″ (M) 8.5″ (L) 9″ (XL) 9.5″ (XXL) 10″ (XXXL)
Abbreviations:
ch – chain
sc – single crochet
dc – double crochet
sl st – slip stitch
sk – skip
st(s) – stitch(es)
rep – repeat
t – turn
Difficulty Level:
Level 2 – Easy
Pattern Notes:
-For reference, model is 5’5” tall with a 39″ bust, and wearing the Weekender Tunic in a size Medium.
-Sizing listed in the pattern will be in X-Small, Small, Medium, Large, Xl, 2X, and 3X listed in parenthesis such as 36 (38, 40, 42, 44, 46, 48) whereas Ch 36 for size XS, 38 for size S, 40 for size M, 42 for size L, 44 for size XL, 46 for size 2XL, and 48 for size 3XL. When only one number is given, it applies to all sizes. To follow pattern more easily, circle/highlight all numbers pertaining to your size before beginning.
-This tunic is designed to be oversized, worn over a tank and leggings/jeans or as a bathing suit coverup. Please size down if you’re in between sizes Please be aware the stitch style does not offer full coverage.
-Pattern is worked from the bottom up on two panels separately then seamed together. Both panels are made to the same specifications.
-Ch 4 to begin even rows counts as a stitch
-Ch 3 to begin odd row does NOT count as a stitch
-Be sure to check gauge! You don’t want your tunic to come out too large or too small.
-See the video above for further visual instruction!
The Weekender Tunic
Panels
*make 2 identically
Row 1: with contrast color, Ch 74 (78, 82, 86, 90, 94, 98), Dc in 5th ch from hook, Dc in next Ch, Ch 2, sk 2 Ch, *Dc in next Ch, Dc in next Ch, Ch 2, Sk 2 Ch; rep from * until 2 Ch remain, Dc in next CH, Dc in last Ch (36, 38, 40, 42, 44, 46, 48 Dc)
Row 2: Ch 4 (counts as a Dc and Ch 2), turn, *sk 2 Dc, 2 Dc into Ch 2 space, Ch 2, sk 2 Dc; rep from * to end, Dc into top of Ch 3 from Row 1 (36, 38, 40, 42, 44, 46, 48 Dc)
Row 3: Ch 3, turn, *2 Dc into immediate Ch 2 space, Ch 2, sk 2 Dc; rep from * to end, 2 Dc into Ch 4 space from Row 2 (36, 38, 40, 42, 44, 46, 48 Dc)
Repeat Rows 2-3 until you complete Row 26 (26, 28, 28, 30, 30, 32)
*Note: All sizes change to main color after Row 12.
First shoulder
Note: Continue on without breaking yarn
Row 1: Ch 3, turn, *2 Dc into immediate Ch 2 space, Ch 2, sk 2 Dc; rep from * 6 (7, 8, 9, 10, 11, 12) more times, 2 Dc into next Ch 2 space (16, 18, 20, 22, 24, 26, 28 Dc)
Row 2: Ch 4 (counts as a Dc and Ch 2), turn, *sk 2 Dc, 2 Dc into Ch 2 space, Ch 2, sk 2 Dc; rep from * to end, Dc into top of Ch 3 from Row 1 (16, 18, 20, 22, 24, 26, 28 Dc)
Row 3: Ch 3, turn, *2 Dc into immediate Ch 2 space, Ch 2, sk 2 Dc; rep from * 5 (6, 7, 8, 9, 10, 11) more times, 2 Dc into next Ch 2 space (14, 16, 18, 20, 22, 24, 26 Dc)
Row 4: Ch 4 (counts as a Dc and Ch 2), turn, *sk 2 Dc, 2 Dc into Ch 2 space, Ch 2, sk 2 Dc; rep from * to end, Dc into top of Ch 3 from Row 1 (14, 16, 18, 20, 22, 24, 26 Dc)
Row 5: Ch 3, turn, *2 Dc into immediate Ch 2 space, Ch 2, sk 2 Dc; rep from * 4 (5, 6, 7, 8, 9, 10) more times, 2 Dc into next Ch 2 space (12, 14, 16, 18, 20, 22, 24 Dc)
Row 6: Ch 4 (counts as a Dc and Ch 2), turn, *sk 2 Dc, 2 Dc into Ch 2 space, Ch 2, sk 2 Dc; rep from * to end, Dc into top of Ch 3 from Row 1 (12, 14, 16, 18, 20, 22, 24 Dc)
Row 7: Ch 3, turn, *2 Dc into immediate Ch 2 space, Ch 2, sk 2 Dc; rep from * 3 (4, 5, 6, 7, 8, 9) more times, 2 Dc into next Ch 2 space (10, 12, 14, 16, 18, 20, 22 Dc)
Row 8: Ch 4 (counts as a Dc and Ch 2), turn, *sk 2 Dc, 2 Dc into Ch 2 space, Ch 2, sk 2 Dc; rep from * to end, Dc into top of Ch 3 from Row 1 (10, 12, 14, 16, 18, 20, 22 Dc)
Finish off, weave all ends.
Second shoulder
Note: work from Row 26 (26, 28, 28, 30, 30, 32) continuing on from the end of Row 1 of First Shoulder. Skip 2 Dc and join yarn to next Ch 2 space.
Row 1: Ch 3, turn, Dc into immediate Ch 2 space, Ch 2, sk 2 Dc, *2 Dc into Ch 2 space, Ch 2, sk 2 Dc; rep from * 6 (7, 8, 9, 10, 11, 12) more times, 2 Dc into next Ch 2 space (16, 18, 20, 22, 24, 26, 28 Dc)
Row 2: Ch 4 (counts as a Dc and Ch 2), turn, *sk 2 Dc, 2 Dc into Ch 2 space, Ch 2, sk 2 Dc; rep from * to last Ch space, 2 Dc into last Ch 2 space (16, 18, 20, 22, 24, 26, 28 Dc)
Row 3: Ch 3, turn, *2 Dc into immediate Ch 2 space, Ch 2, sk 2 Dc; rep from * 5 (6, 7, 8, 9, 10, 11) more times, 2 Dc into next Ch 2 space (14, 16, 18, 20, 22, 24, 26 Dc)
Row 4: Ch 4 (counts as a Dc and Ch 2), turn, *sk 2 Dc, 2 Dc into Ch 2 space, Ch 2, sk 2 Dc; rep from * to last Ch space, 2 Dc into last Ch 2 space (14, 16, 18, 20, 22, 24, 26 Dc)
Row 5: Ch 3, turn, *2 Dc into immediate Ch 2 space, Ch 2, sk 2 Dc; rep from * 4 (5, 6, 7, 8, 9, 10) more times, 2 Dc into next Ch 2 space (12, 14, 16, 18, 20, 22, 24 Dc)
Row 6: Ch 4 (counts as a Dc and Ch 2), turn, *sk 2 Dc, 2 Dc into Ch 2 space, Ch 2, sk 2 Dc; rep from * to last Ch space, 2 Dc into last Ch 2 space (12, 14, 16, 18, 20, 22, 24 Dc)
Row 7: Ch 3, turn, *2 Dc into immediate Ch 2 space, Ch 2, sk 2 Dc; rep from * 3 (4, 5, 6, 7, 8, 9) more times, 2 Dc into next Ch 2 space (10, 12, 14, 16, 18, 20, 22 Dc)
Row 8: Ch 4 (counts as a Dc and Ch 2), turn, *sk 2 Dc, 2 Dc into Ch 2 space, Ch 2, sk 2 Dc; rep from * to last Ch space, 2 Dc into last Ch 2 space (10, 12, 14, 16, 18, 20, 22 Dc)
Seaming
With right sides facing and a spare piece of yarn about three times the length of your seam, whip stitch Rows 8 of the First Shoulder together. Repeat with the Second Shoulder.
With a measuring tape, mark the armhole length for your size on both sides per the measurements above. Take care to mark the right and left armholes on the front and back panels and check to make sure you’re marking the same Row from the shoulder seams in all these spots.
Beginning at your stitch markers, mattress stitch the side seam to Row 12 of your front and back panels with main color yarn. I left my tunic open for more movement and weaved my seam end at Row 12 of the Panels. You may join contrast color yarn and finish the seam to close the hip slit.
Repeat side seam on other side.
Weave all ends.
Turn garment right side out.
Scallop Neckline
Join main color yarn to either shoulder seam at neckline opening. Work along neckline opening as pictured below. Stitches are worked along edge of right and left shoulders.
Ch 2, 5 Dc into turning Ch from Row 7.
Slip stitch to Ch space below.
5 Dc into turning Ch from Row 5.
Slip stitch to Ch space below.
5 Dc into turning Ch from Row 3.
Slip stitch to Ch space below.
5 Dc into turning Ch from Row 1.
Slip stitch between 2 skipped Dc at base of neckline. Continue onto other shoulder.
5 Dc into first Dc of Row 1.
Slip stitch to top of last Dc on Row 2.
5 Dc into first Dc of Row 3.
Slip stitch to top of last Dc on Row 4.
5 Dc into first Dc of Row 5.
Slip stitch to top of last Dc on Row 6.
5 Dc into first Dc of Row 7.
Slip stitch to top of last Dc on Row 8.
Flip over to work on other side of neckline. Repeat from beginning of neckline instructions.
Finish off after last slip stitch on the backside. Weave ends.
Be sure to enter in the giveaway below to win 8 skeins of Rewind yarn!
Earning a Living with my Handmade Home
If you love crocheting and knitting, you should think about starting a blog! I’ll help you get started to turn your hobby into a money-making career with my free “Start a Blog” guide.
Or you can check out my latest income report to see how this blog earned over $10,000 last month!
I cannot find th3 link for this video. Did you forget to put it in?
Thank you.
It’s still uploading, it’ll be live later today!
Cute tunic, can’t wait to make it!
Proofreader check: pattern notes days, “Be sure to check gauge! You don’t want your hat to come out too large or too small.” When this is a tunic pattern, not a hat.
and make 2 identitcally has too many t’s. =identically.
Love it! When I catch up I will make this!
The wool looks fabulous. So looking forward to trying the pattern with It.
Very cute
Lovely yarn….it looks awesome!
Pretty yarn. Would be fun to try something new.
Love this pattern! Gonna make one for me and my 2 daughters.
Hi what a beautiful crochet piece.I have tried and tried but cant seem to get the pattern right i have watched the video as well.I need to know about the number of stitches each row should have i have tried counting what the pattern says but still comes up short.Can you please explain.Would love to make this for someone really special.The newby crocheter.
Love this pattern! Do you have any recommendations for substitutions for this yarn?
Hi Ashleigh,
What a great pattern! Thanks for sharing it with us! The rewind yarn definitely looks like it has an interesting new feel to it. I might just have to check it out!