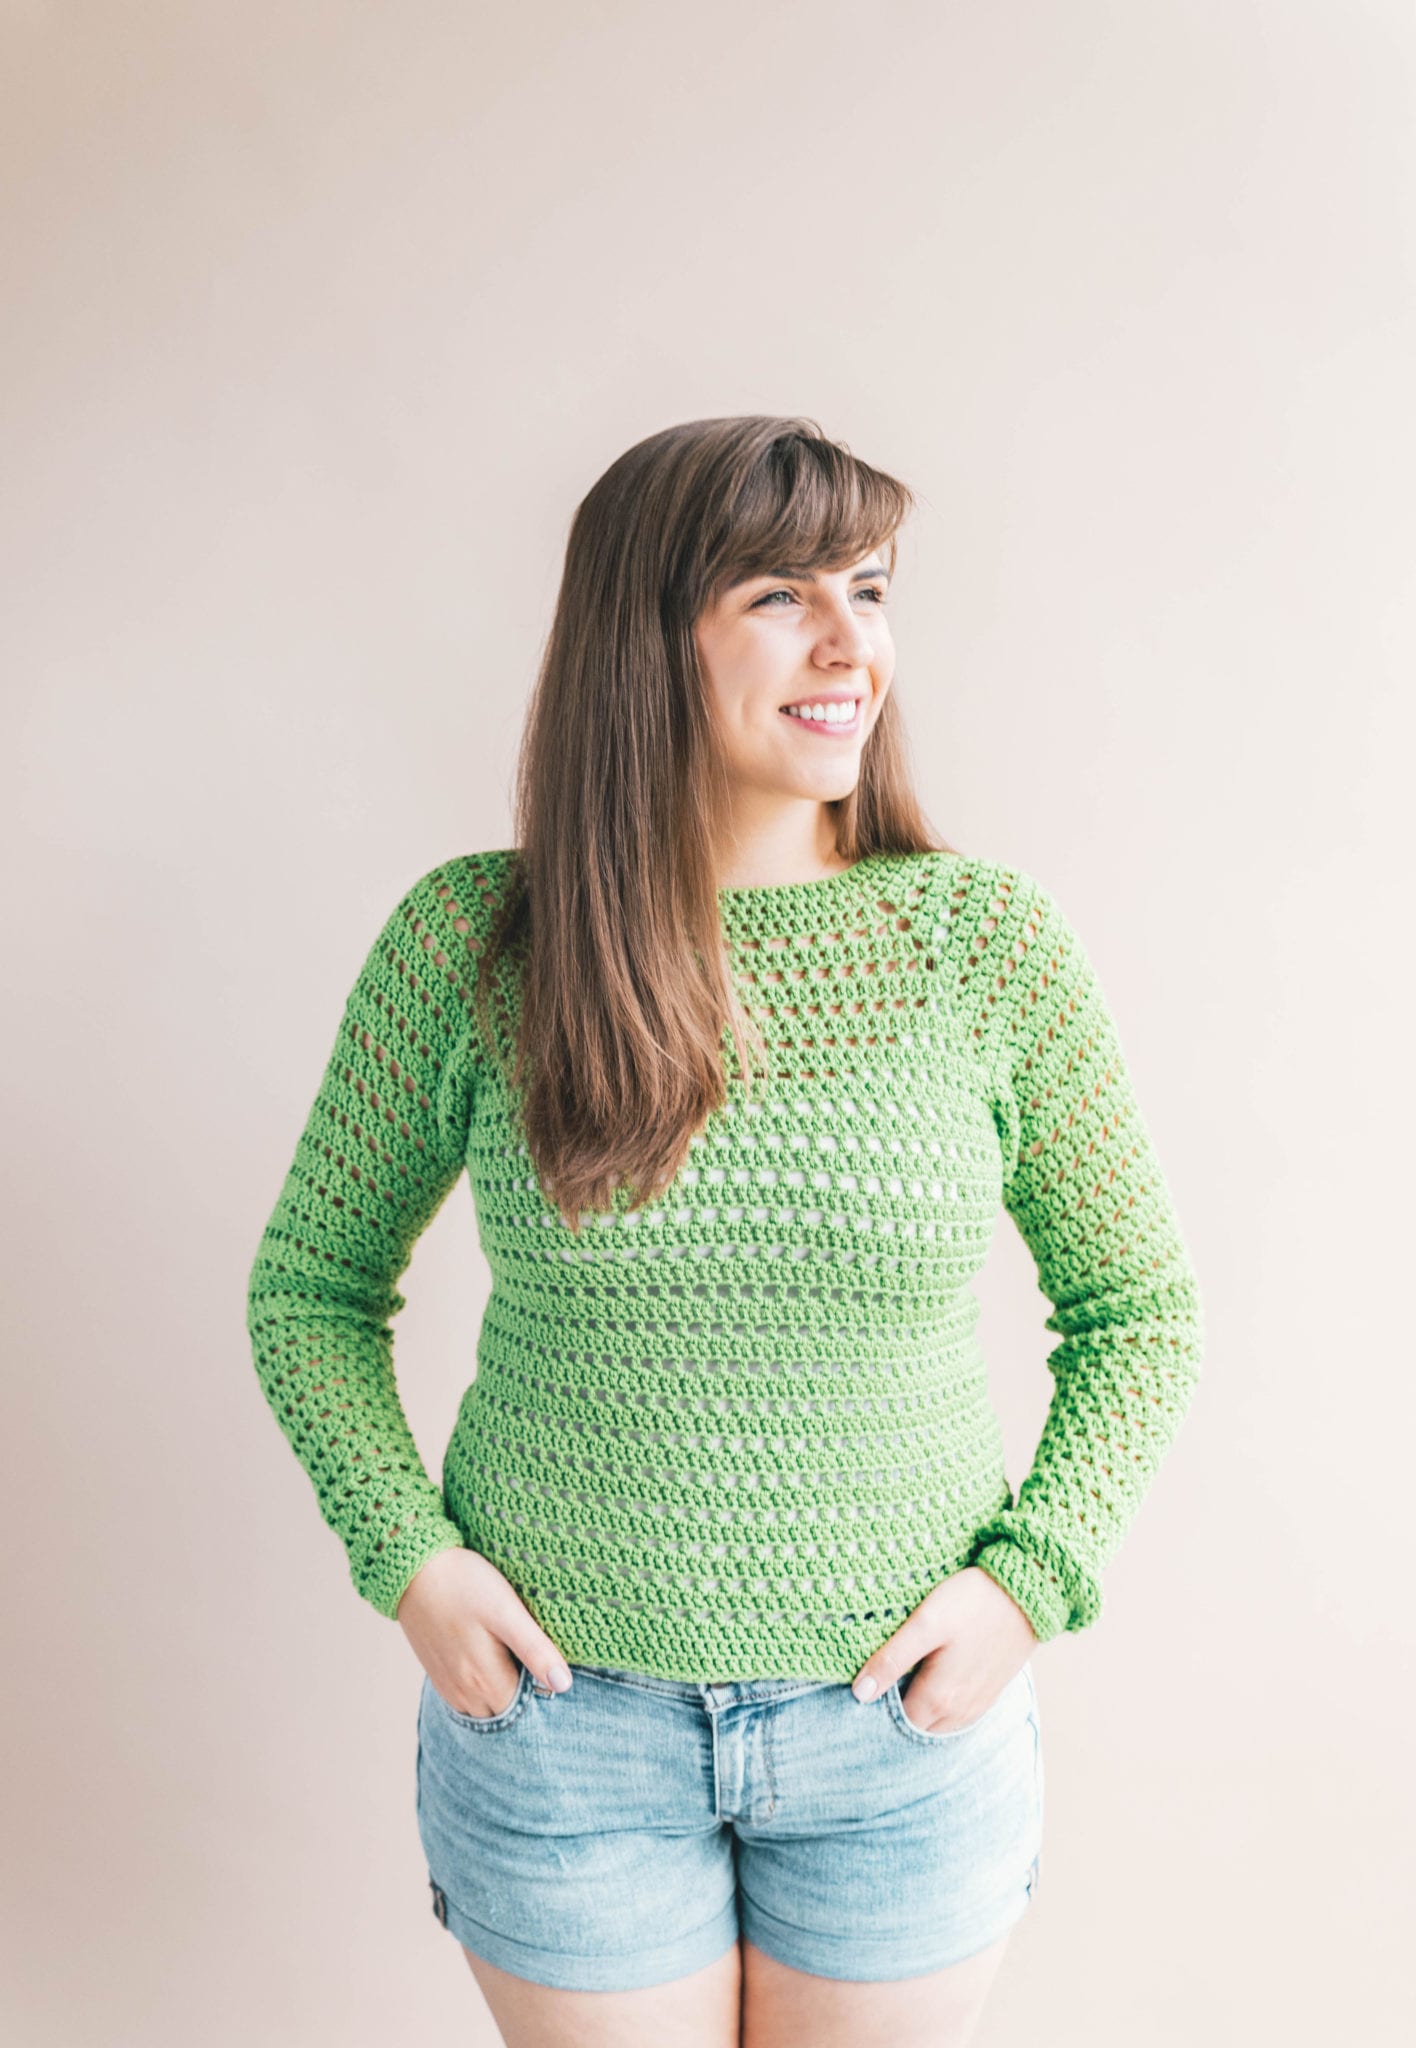
It’s finally here, my very first raglan style sweater design – the Crochet Pucker Pullover Sweater!
I’ve wanted to work up a garment in this style for a while and I’m so proud to finally be bringing you the sweater along with my friends at JOANN. They’ve got the new Lion Brand ZZ Twist yarn in an array of beautiful colors and I can’t wait to tell you more about them below.
This light, airy sweater a pullover style with flattering fit and a really easy seamless pattern. Let’s get into the details!
The Design
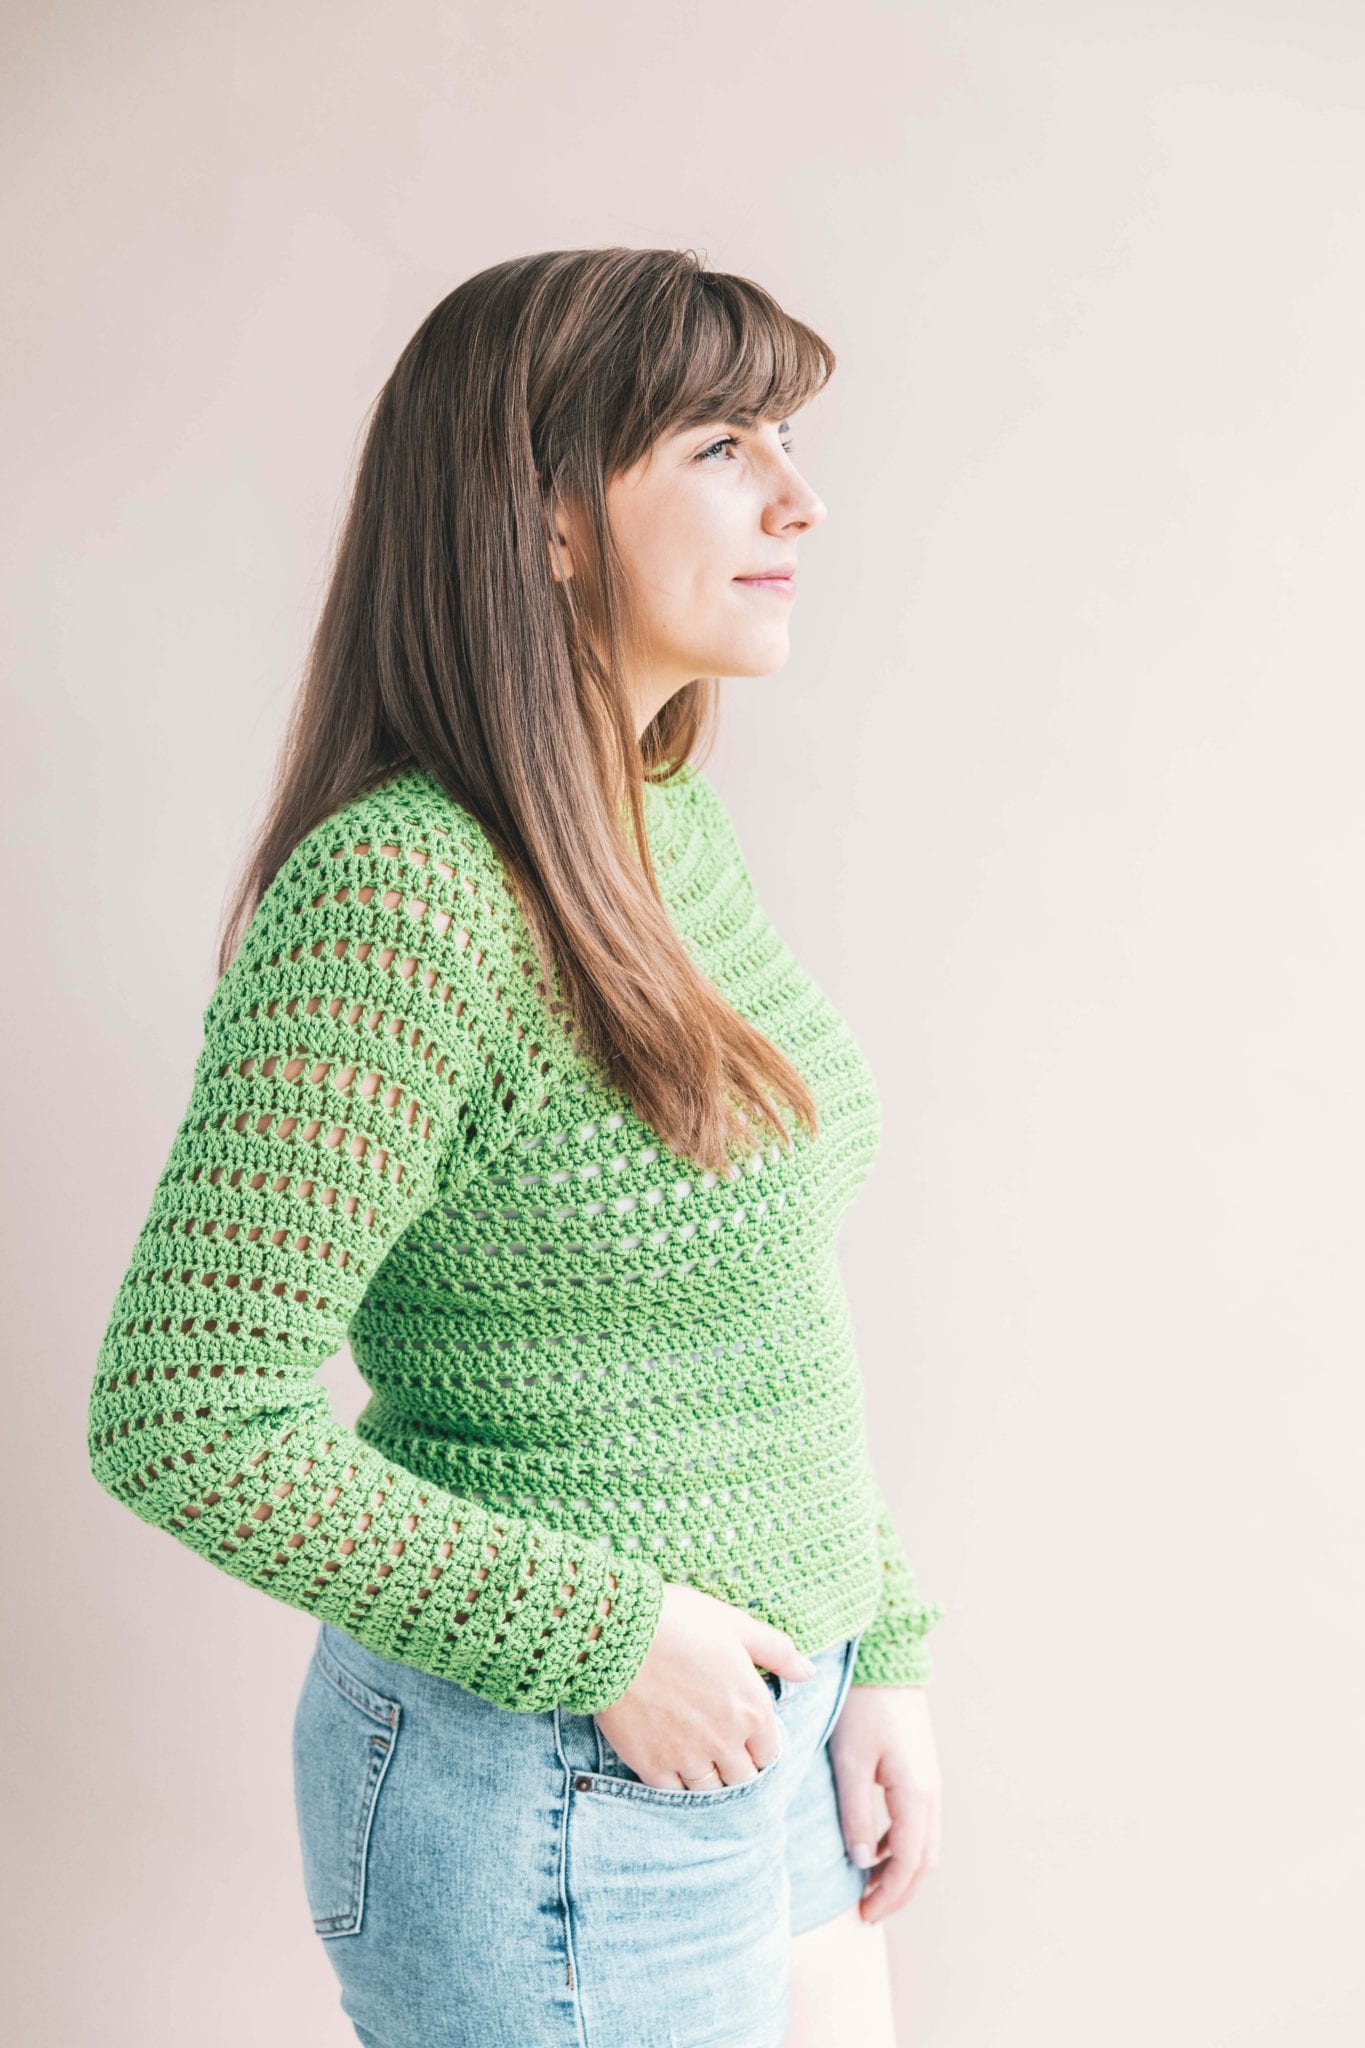
Let’s talk raglans – think of a baseball style tee shirt. You know how it has those diagonal sections of color stretching from the neckline down to the underarm area? A raglan style sweater is constructed in a similar manner. It allows for a shoulder hugging fit while being really simple to work up.
It may seem daunting, but this project is a lot more straight-forward than ya think. We’re going to work in the round for a while, skip some stitches to leave armholes, work up the rest of the body, then move back up to those armholes to work the sleeves right off the already-made garment. No seams, no stress!
I wanted to add in a tiny bit of detailing with these window stitches. They’re just chain 1, skip 1 spaces that add a bit more breathability to this sweater for late summer and moving into fall. I love the intricate look that these window stitches give to the top, but more than that I love how easy it is to create such a complex looking garment!
SUMMER PATTERNS I LOVE (& you should too)
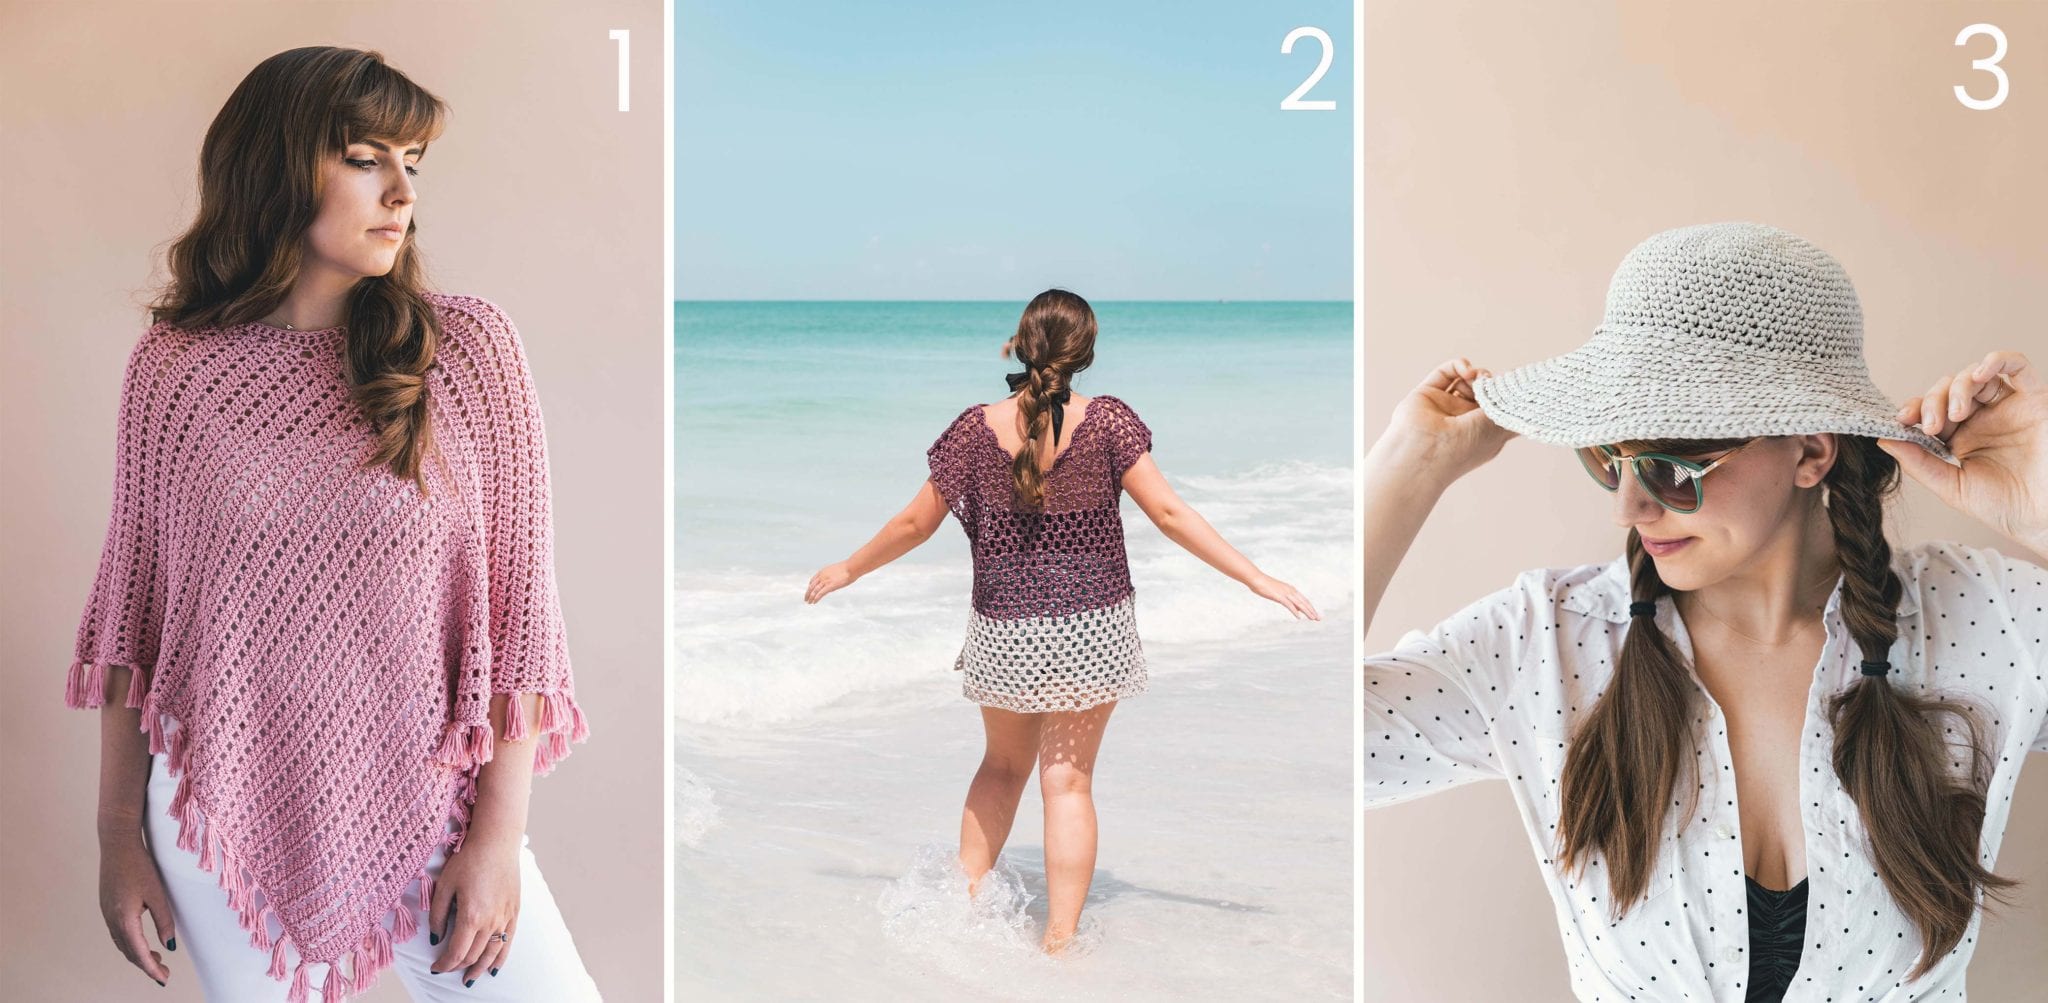
1. Crochet Ava Poncho / 2. Crochet Weekender Tunic / 3. Crochet June Sun Hat
The Fit
The pucker pullover is a fairly fitted sweater without negative or positive ease. It’s designed to fit like a glove, in a comfortable way. The sleeves are just fitted enough to keep them from billowing in the breeze without feeling tight. The bodice has a bit of a boxy fit, which lends itself to flatter any and every body type. Not to mention that with minimal shaping, this sweater is done in a flash!
If you’re apprehensive at all about making a fitted sweater, sizing up by one size should give you a roomier, more “sweatshirt” style fit without losing all that gorgeous detailing. You can always make this sweater longer if you like by extending the body stitches too (more on that in the pattern notes below).
The Yarn
I shopped at JOANN for Lion Brand’s new ZZ Twist yarn that was created with crocheters in mind – finally! It really made this design pop for several reasons. One being that this Green Apple color is almost the exact same shade of pucker green as the new JOANN branding! Being that I made this project with JOANN in mind, I had to go with their signature color and I love the way it turned out.
This yarn is spun in a Z style twist (thus the name!) as opposed to the traditional S style twist. Basically this yarn is spun in the opposite direction as “normal” yarn. This is because it’s made to work with your crochet hook, not against it. The Z twist is the same direction your hook moves in and out of the stitches in your work! So this yarn works with your crocheting tools similarly to how S twist yarns work with knitting needles. So neat!

And that’s not even my favorite part of this yarn. I cannot get over the drape of ZZ Twist! When we’re making clothes, drape is everything. If a garment doesn’t drape, it might as well be made of burlap. It’s stiff and uncomfortable and let’s face it – a lot of handmade clothes can come out this way. But this yarn solves all of those problems – seriously! I’m trying to keep my mind and hands open to other yarns, but I don’t think I can – I’ve found my yarn soulmate and it’s ZZ Twist!
The colors that this yarn comes in are just as stunning as the drape. And a little birdie told me that JOANN is actually getting some of the all new colors of ZZ Twist very soon! So keep an eye out in stores for some gorgeous hues – they’re rich and saturated without being wildly vibrant. Even the brighter tones like Green Apple and Coral aren’t highlighter bright, they’re rich natural brights. Lion Brand really nailed it with this one and I think you really just have to grab some from JOANN and try it to believe it!
I’ve got all sorts of resources for you below, from photo help to stitch charts! If you’d like a handy printable version that includes all these helpful tools, grab the inexpensive PDF download here!
PATTERN
- Get the ad-free, large print, printable PDF pattern HERE.
- Grab the Ultimate Pattern Bundle that includes 150+ patterns just like this one on sale for $20 today HERE.
- PIN this pattern to your Pinterest boards for later HERE.
- Add this pattern to your Ravelry queue HERE.
To sum it up:
The crochet Pucker Pullover is a slightly fitted raglan style sweater with open window stitches that lend to comfy breathability through all four seasons. With minimal shaping and easy seamless construction, this pullover is great for those wanting to try out crocheting a raglan for the very first time. Make it with Lion Brand Yarn’s new ZZ Twist from JOANN!
Materials:
–Lion Brand ZZ Twist yarn (Weight: 4/Medium – 3.5oz, 246 yds)
Color: Green Apple – 4 (4, 4, 5, 5, 6, 6) skeins (approx. 340, 390, 400, 450, 480, 530, 550 g)
-Measuring tape or ruler
Sizes:
XS, S, M, L, Xl, 2XL, 3XL
Gauge:
15 sts x 10 rows in Dc = 4”
Measurements:
Bust: 28 (32, 36, 40, 44, 48, 52)“
Width across back: 14 (15, 15.5, 16.5, 17.5, 18, 18)″
Length: 19.5 (20, 21, 21.5, 22, 23, 23)″
Armhole: 6 (7, 7, 8, 8, 9, 9)″
Sleeve Length: 17 (18, 18, 18, 19, 19)″
Abbreviations (US terms):
Ch – chain
st st – slip stitch
Sc – single crochet
Dc – double crochet
Dc3tog – double crochet three together
sk – skip
st(s) – stitch(es)
t – turn
rpt – repeat
* – repeat the instructions following the single asterisk as directed
* * – repeat instructions between asterisks as many times as directed or repeat at specified locations
( ) – within round instruction: work instructions within parentheses as many times as directed or work a group of stitches all in the same stitch or space
( ) – at end of round: round stitch count
Skill Level: Level 3 Intermediate
Pattern Notes:
– This sweater fits true to size. For reference, model is 5’5” tall with a 38” bust and wearing the Pucker Pullover in size Medium. If you are between sizes, please size up.
– Sizing listed in the pattern will be in X-Small with Small, Medium, Large, Xl, 2X, and 3X listed in parenthesis such as 36 “(41, 46, 51, 56, 61, 66)” whereas Ch 36 for size XS, 41 for size S, 46 for size M, 51 for size L, 56 for size XL, 61 for size 2X and 66 for size 3X. When only one number is given, it applies to all sizes. To follow pattern more easily, circle/highlight all numbers pertaining to your size before beginning.
– Pattern is worked in a yoked top-down method, but don’t let that scare you. We will just crochet in the round to complete the neckline, leave spaces for armholes, and continue in the round to make the body. Rejoin yarn to the armholes and work down the sleeve with easy shaping.
– Entire pattern works alternating “solid rounds” and “window rounds” (marked in the pattern).
– s does count as a stitch.
– Ch 1, skip 1 does count as a stitch on window rounds.
– Ch 2 at end of rounds & Ch2 at corners of yoke do not count as a stitch.
-To avoid a crooked seam down the back of your sweater you can turn at the end of each round.
–You’ll notice that the photos have an extra round of Dc’s at the neckline – ignore this and follow the written pattern!
– Please note that the chart shows the turning chain as a stitch, it does not count as a stitch for all ch 2 rows.
Crochet Pucker Pullover
Round 1: Ch 52 (60, 68, 76, 84, 92, 100) sl st to first Ch (next to slip knot) to form a ring, Ch 2, (52, 60, 68, 76, 84, 92, 100)
*Or begin with foundation Dcs for a neckline with more stretch and skip to round 3*
Round 2:Dc in each Ch st around, sl st to 1st Dc to join, Ch 2 (52, 60, 68, 76, 84, 92, 100)
Round 3: Dc in next 5 (6, 7, 8, 9, 10, 11), *2 Dc in next Dc, Ch 2, (skip no sts)2 Dc in next Dc, Dc in next 11 (13, 15, 17, 19, 21, 23); rpt from * 2 more times, 2 Dc in next Dc, Ch 2, (skip no sts)2 Dc in next Dc, Dc in next 6 (7, 8, 9, 10, 11, 12), to join, Ch 2 (60, 68, 76, 84, 92, 100, 108)
Round 4 (window round): Dc in first Dc, *Ch 1, sk 1, Dc; rpt from * to first Ch 2 space, **Ch 1, (Dc, Ch 2, Dc) in Ch 2 space, Ch 1, Dc in immediate next st, [*Ch 1, sk 1, Dc; rpt from * to next Ch 2 space]; rpt from ** 2 more times, (Dc, Ch 2, Dc) in Ch 2 space, Dc in immeditate next st, *Ch 1, sk 1, Dc; rpt from * to end, sl st to 1st Dc to join, Ch 2 (76, 84, 92, 100, 108, 116, 124)
Round 5 (solid round): Dc in each Dc and Ch 1 space to first Ch 2 space, *(2 Dc, Ch 2, 2 Dc) in Ch 2 space, Dc in next Dc and each Ch 1 and Dc to next Ch 2 space; rpt from * 2 more times, (2 Dc, Ch 2, 2 Dc) in Ch 2 space, Dc in next Dc and each Ch 1 and Dc to end, sl st to 1st Dc to join, Ch 2 (92, 100, 108, 116, 124, 132, 140)
Alternate rounds 4 and 5 until you complete the appropriate number of rows for your size.
| Yoke Stitch Table | Work to Row: | Length of yoke (neckline to last yoke round @ increases) | Stitch count – last yoke round |
| XS | 12 | 7” | 204 |
| S | 14 | 8” | 244 |
| M | 14 | 8” | 252 |
| L | 16 | 9” | 292 |
| XL | 16 | 9” | 300 |
| XXL | 18 | 10” | 340 |
| XXXL | 18 | 10” | 348 |
All sizes should finish with a window round.
Now we will divide the body for sleeves in our next solid Row.
Dividing Row: Dc in each Dc and Ch 1 space to first Ch 2 space, 2 Dc into first Ch 2 space, Ch 3, sk to next Ch 2 space, 2 Dc into 2nd Ch 2 space, Dc in each Dc and Ch 1 space to third Ch 2 space, 2 Dc into third Ch 2 space, Ch 3, sk to next Ch 2 space, 2 Dc into last Ch 2 space, Dc in each Dc and Ch 1 space to end, sl st to 1st Dc to join, Ch 2 (110, 130, 134, 154, 158, 178, 182)
Body:
Round 1: Dc in first Dc, *[Ch 1, sk 1 Dc; rpt to space], Ch 1, sk 1 Ch, Dc into 2nd Ch, Ch 1, sk 1 Ch, Dc into next Dc; rpt from * once more, *, sl st to 1st Dc to join, Ch 2 (116, 136, 140, 160, 164, 184, 188)
Round 2 (solid round): Dc in each Dc and Ch 1 space around, sl st to 1st Dc to join, Ch 2 (116, 136, 140, 160, 164, 184, 188)
Round 3 (window round): Dc in first Dc, *Ch 1, sk 1, Dc; rpt from * around, Ch 1, sk last Dc, sl st to 1st Dc to join, Ch 2 (116, 136, 140, 160, 164, 184, 188)
Alternate Rounds 2 and 3 until you complete Round 26 (28, 30, 32, 34, 36, 36)
If you’d like to make your pullover longer, simply add more rounds. Just be sure to always end with a solid round.
Hemline:
Round 1: Dc in each Dc around, sl st to 1st Dc to join, Ch 2 (116, 136, 140, 160, 164, 184, 188)
Round 2: Dc in each Dc around, sl st to 1st Dc to join, Ch 1 (116, 136, 140, 160, 164, 184, 188)
Round 3: Sc in each Dc around, sl st to 1st sc to join, finish off, weave ends (116, 136, 140, 160, 164, 184, 188)
Sleeves:
Join yarn to first Dc just to the left of underarm Ch 3 space.
Round 1: Ch 2, work 7 Dc evenly across rough edges of corner stitches and underarm Ch 3 space, Dc in the top of each unworked st on the yoke armhole around, sl st to 1st Dc to join, Ch 2 (57, 67, 69, 79, 81, 91, 93)
Round 2 (window round): Dc in first Dc, *Ch 1, sk 1, Dc; rpt from * around, Ch 1, sl st to 1st Dc to join, Ch 2 (57, 67, 69, 79, 81, 91, 93)
Round 3 (decrease round): Dc in first st, *Dc3tog over next Ch 1, Dc, and Ch 1 spaces, Dc in next 5 (count Dc and Ch 1 spaces); rpt from* around, Dc in any remaining sts, sl st to 1st Dc to join, Ch 2 (43, 51, 53, 61, 61, 69, 71)
Round 4: Rpt Round 2 (window round) (43, 51, 53, 61, 61, 69, 71)
Round 5 (solid round): Dc in each Dc and Ch 1 space around, sl st to 1st Dc to join, Ch 2 (43, 51, 53, 61, 61, 69, 71)
Alternate Rounds 4 and 5 until you complete Row 20 (22, 22, 22, 24, 24, 24)
Round 21 (23, 23, 23, 25, 25, 25): Rpt Round 3 (decrease round) (33, 39, 41, 47, 47, 51, 55)
Alternate Rounds 4 and 5 until you complete Row 38 (40, 40, 40, 42, 42, 42)
Round 38 (40, 40, 40, 42, 42, 42): Rpt Round 3 (decrease round) (25, 31, 31, 37, 37, 39, 43)
Repeat Rounds 4 and 5 once more each.
Cuff:
Round 1: Dc in each Dc around, sl st to 1st Dc to join, (25, 31, 31, 37, 37, 39, 43)
Round 2: Sc in each Dc around, sl st to 1st Dc to join, finish off, weave ends (25, 31, 31, 37, 37, 39, 43)
Repeat entire sleeve on other armhole.
Weave all ends.
Earning a Living with my Handmade Home
If you love crocheting and knitting, you should think about starting a blog! I’ll help you get started to turn your hobby into a money-making career with my free “Start a Blog” guide.
Or you can check out my latest income report to see how this blog earned over $10,000 last month!
Hi Ashleigh, what a beautiful pattern! I love that you’re starting to design garments using the raglan style. 🙂
Rachel
SO excited to start this sweater this week! Just in time for the fall season 🙂 Thinking about trying out a different yarn, Ill give an update on how it goes!
I just bought your PD of this crochet pattern. Do you anticipate creating a pattern similar to the knit pullover you created? Knitting and I don’t get along as well as crochet and I do. 🙂
Looking forward to making this current one. Thanks, LC Caldwell
Will definitely be making this jumper , love this pattern . Have already made a shrug in this window pattern , one of my favourites . So glad you have made it a no sew jumper too ????
Thank you for this great pattern! I
Hi Ashleigh, great pattern. I’m looking forward to making this pullover. Would you please consider doing a you tube tutorial for this item?
Hi, Ashleigh. Just finished this sweater. I had to make the largest size to get a good fit around my chest, but because I have narrow shoulders and slim arms the sleeves were a bit baggy and too long. I worked 24 rows plus edging, with dec on rows 3, 15 and 23 which made the length perfect. I think maybe next time I’ll dec on row 1 and maybe drop a hook size to make the sleeve narrower. On the whole though, great pattern. Quick, easy and no sewing!