
This beginner crochet cardigan is one of my favorite patterns from last winter so I’m bringing it back in a new fall feature!
You might remember this pattern from when I first posted this Everyday Cardigan it here on the blog earlier this year. This post holds the same pattern, showing you a bit of a different way to style it!
LAYERING PATTERNS I LOVE (& you should too)
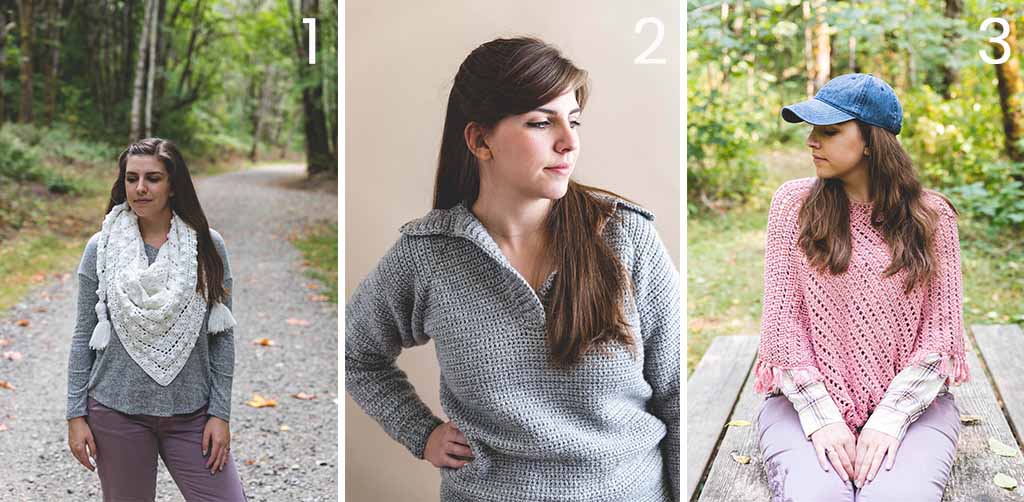
1. Crochet Le Nuage Wrap / 2. Crochet Rainier Sweater / 3. Crochet Ava Poncho
The Yarn
I chose to use Lion Brand’s Touch of Alpaca yarn for this pattern. It’s a really soft, fuzzy acrylic yarn with (you guessed it!) just a touch of alpaca! The color lineup in this yarn is part of why I chose it for this pattern – it’s the perfect grey for layering over every single outfit!
Lion Brand created a kit for this pattern in some stunning color options! I used the Oxford Grey colorway for this pattern, but I also love those cream and Taupe colorways too.
Grab your kit by clicking here – it comes with a printed copy of the pattern too!


PATTERN
- Get the ad-free, large print, printable PDF pattern HERE.
- Grab the Ultimate Pattern Bundle that includes 150+ patterns just like this one on sale for $20 today HERE.
- PIN this pattern to your Pinterest boards for later HERE.
- Add this pattern to your Ravelry queue HERE.
Materials:
Click HERE to grab the kit with everything you need from Lion Brand!
–Tape measure or ruler
(Click HERE to shop all my favorite tools!)
Abbreviations (US terms):
ch – chain
hdc – half double crochet
dc – double crochet
fpdc – front post double crochet
bpdc – back post double crochet
st(s) – stitch(es)
t – turn
Skill Level: Level 2 Easy
Notes:
-This cardigan fits true to size. For reference, model is 5’5” tall, and wearing the Everyday Cardigan size Medium.
-Sizing listed in the pattern will be in X-Small with Small, Medium, Large, Xl, 2X, 3X, and 4X listed in parenthesis such as 36 “(41, 46, 51, 56, 61, 66)” whereas Ch 36 for size XS, 41 for size S, 46 for size M, 51 for size L, 56 for size XL, 61 for size 2X and 66 for size 3X. When only one number is given, it applies to all sizes. To follow pattern more easily, circle/highlight all numbers pertaining to your size before beginning.
-Pattern is worked by first making the back panel, continuing with adding the front panels without seaming, seaming up the sides, adding hemline and neckline ribbing, and making sleeve pieces separately to seam later. Assembly instructions will be the same for all sizes.
-The video tutorial helps a lot with this, be sure to view that at https://www.sewrella.com/everyday-cardigan-video
Gauge:
13 Hdc = 4”
11 Rows = 4”
Crochet Everyday Cardigan
Back piece:
Ch 51 (54, 57, 60, 63, 65, 67) Hdc in 3rd st and in each st, Ch 2, t
Row 2: Hdc in each st, Ch 2, t
Repeat Row 2 until you reach the correct length for your size as follows:
X-Small: Work to Row 54
Small: Work to Row 56
Medium: Work to Row 58
Large: Work to Row 60
XL: Work to Row 62
2XL: Work to Row 62
3XL: Work to Row 63
Proceed to front panels without breaking yarn
Front Panels:
Row 1: Hdc in each of the next 23 (25, 26, 28, 29, 30, 31) sts, Ch 2, t (you should only have worked just shy of halfway across your back piece)
Row 2: Hdc in each st, Ch 2, turn
Repeat Row 2 until you reach the correct length for your size as follows:
X-Small: Work to Row 54
Small: Work to Row 56
Medium: Work to Row 58
Large: Work to Row 60
XL: Work to Row 62
2XL: Work to Row 62
3XL: Work to Row 63
Finish off yarn.
Begin second front panel by joining yarn back to Row 1 of first front panel. Skip 2 sts after you finished Row 1 (after you Ch 2, t), join yarn, Ch 2, Hdc in each st across to the end of the row, Ch 2, t
Row 2: Hdc in each st, Ch 2, turn
Repeat Row 2 until you reach the correct length for your size as follows:
X-Small: Work to Row 54
Small: Work to Row 56
Medium: Work to Row 58
Large: Work to Row 60
XL: Work to Row 62
2XL: Work to Row 62
3XL: Work to Row 63
Finish off yarn, weave all ends from front and back panels.
Side Seams:
With a spare piece of yarn (cut to about 3x the length of the area where your side seam will be), use a mattress stitch to seam up the sides of your cardigan.
Leave armholes for your size as follows:
X-Small: 6″/15.5 cm
Small: 6.5″/16.5 cm
Medium: 7″/17.5 cm
Large: 7.5″/19 cm
XL: 8″/20.5 cm
2XL: 8.5″/21.5 cm
3XL: 9″/23 cm
Repeat side seam on the other side. Weave all ends.
Sleeves:
*make 2
*Worked from the cuff up in the round and seamed to the armhole
Ch 22 (24, 26, 28, 30, 32, 34), sl st to the first Ch of the round (next to the slip knot) to form a ring, Ch 2, Dc in each st around, sl st to join, Ch 2, do not t
Round 2: *Fpdc, Bpdc, rep from * around, sl st to join, Ch 2, do not t
Rounds 3-5: Repeat Round 2
Round 6: Hdc in each st, sl st to join, Ch 2, t
Rounds 7-18: Repeat Round 6
Round 19: *2 Hdc, Hdc next 5 sts, repeat from * around, Hdc in any remaining sts, sl st to join, Ch 2, t
Rounds 20-24: Repeat Round 6
Round 25: Repeat Round 19
Rounds 26-29: Repeat Round 6
Round 30: Repeat Round 19
Repeat Row 6 until you reach the correct length for your size as follows:
X-Small: Work to Round 52
Small: Work to Round 54
Medium: Work to Round 55
Large: Work to Round 56
XL: Work to Round 57
2XL: Work to Round 59
3XL: Work to Round 60
Finish off leaving a very long tail for sewing, whip stitch sleeve onto armhole and weave ends.
Make second sleeve the same way. (Beware of any tension differences, this can make your sleeves two different sizes!)
Hemline Ribbing:
Join yarn to the last row of your front panel (if you are looking at the cardigan, not wearing it, this will be the corner on the right panel [or left panel if you’re left handed]), Ch 2, Dc in each st around the entire hemline of the cardigan (working over the first front panel, over the side seam, across the back panel [you’re working into the original foundation chain here], over the second side seam, and across the other front panel), Ch 2, t
Row 2: Dc, *Bpdc, Fpdc, repeat from * in each st, Dc in last st, Ch 2, t
Row 3: Dc, *Fpdc, Bpdc, repeat from * in each st, Dc in last st, Ch 2, t
Rows 4-7: Repeat Rows 2 & 3 alternating twice more
Row 8: Sl st loosely in each st, Ch 2, turn your cardigan to work down the rough edge of your neckline, do not break yarn.
Neckline Ribbing:
Dc evenly in each st around entire neckline (working 1 Dc into each of 3 skipped sts between front panels) until you reach other side of ribbing, Ch 2, turn
Row 2: Dc, *Bpdc, Fpdc, repeat from * in each st, Dc in last st, Ch 2, t
Row 3: Dc, *Fpdc, Bpdc, repeat from * in each st, Dc in last st, Ch 2, t
Rows 4-7: Repeat Rows 2 & 3 alternating twice more
Finish off, weave all ends.
Earning a Living with my Handmade Home
If you love crocheting and knitting, you should think about starting a blog! I’ll help you get started to turn your hobby into a money-making career with my free “Start a Blog” guide.
Or you can check out my latest income report to see how this blog earned over $10,000 last month!
I love this cardigan! I’m just wondering, what other yarn do you recommend using for this besides LB Touch of Alpaca?
Hola. Ya lo hize y me quedo excelente. Tan abrigador. Besos y cariños desde Piura-Perú ????????????????