
Hey you!
{I’ll apologize right now for the lengthy intro here, but I really do recommend you read through for all my tips on this technique!}
I’ve been working tirelessly over the past week on this set and MAN was it worth it or what?
So you all know that everything I do is crochet, but what you didn’t know is I DON’T KNIT.
Or, I should say, I can’t knit. I mean I could – I don’t have some rare disease that causes me to burst into flame if I pick up a knitting needle. I just don’t know how.
It’s on my list of things to learn for 2017. But that’s another story for another day.

SO being that I can’t knit, I love the detailed, meticulous look of fair isle knitting. The images, the classic look, the finesse!
When I came across a technique on Pinterest that would allow me to get that same knit look with my crochet hook, the wheels started turning!
The technique is a very simple modified single crochet – called the Center Single Crochet. It’s really very easy, you’re just working the single crochet into the center of the stitch, instead of into the top two loops of the stitch as we normally would.
Here is a great center single crochet tutorial.
I’m in love with this style and want to cover my house in faux knit fair isle crocheted everything! Socks, throws, bags, sweaters, it could go on and on forever.

Another great advantage to crocheting your fair isle accessories is that it is so much faster than knitting! Crochet in general is quicker than knitting & this technique is no exception. You may find it a tad bit more tedious than regular crochet stitches, because of the attention to color changing detail, but I promise you’ll get the hang of it really quick!

For the fair isle pattern, you’ll need to follow my color chart. You can work with any contrasting colors you like for this pattern, and you can see that I’ve worked with burgundy where the dark blocks are and beige where the white blocks are on the chart.
The chart is available as a free printable below, just click the photo for which chart ya need!

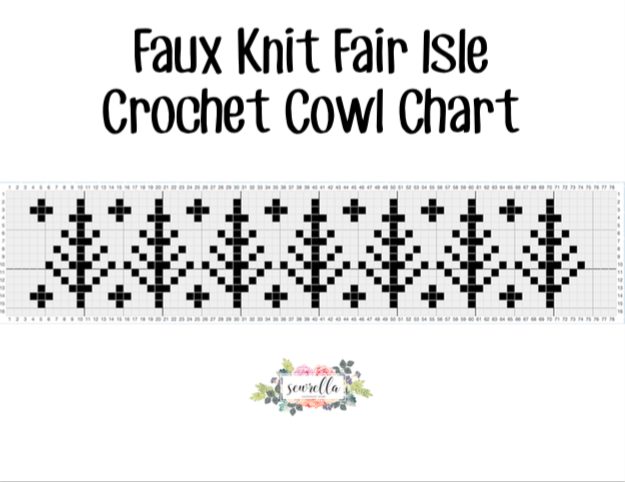
I recommend printing the file and using a colored pen or marker to mark off the stitches as you go. You’ll need to make one CSC (center single crochet) where each box is, in its respective color.
I carry my yarn so that I don’t have tons of snaggable (is that a word?) strings on the under side of my work. Also if I didn’t carry the yarn, those strings would show on the inside of the cowl and look messy.
Because I’m carrying the yarn, it’s a bit tricky to make your stitches without catching your contrasting color on your hook and pulling it through too, showing outside the design where you’d like each particular color to show. This takes a little practice, but you’ll get the hang of it. Don’t worry if you think the work looks a little messy starting out, as you go along your design will be more pronounced!

Without further ado (because this was plenty ado), here’s the free pattern!


PATTERN
- Get the ad-free, large print, printable PDF pattern HERE.
- Grab the Ultimate Pattern Bundle that includes 150+ patterns just like this one on sale for $20 today HERE.
- PIN this pattern to your Pinterest boards for later HERE.
- Add this pattern to your Ravelry queue HERE.
Materials:
-1 skein each Lion Brand Vanna’s Choice in Beige and Burgundy
Click HERE to grab the kit with everything you need from Lion Brand!
-Size J 6mm crochet hook
-Tapestry needle
-Clover USA pom pom maker – I used the 3.3″ (optional)
Unique Stitches:
BLSc: back loop single crochet – single crochet in the back loop only
CSC: center single crochet – instead of stitching in the top two loops as you would with a normal single crochet, insert your hook into the center of the stitch, between the two pillars of the stitch itself (see video linked above for further instruction), finish single crochet as usual
Brim:
With beige, Ch 7, Sc in 2nd and across, Ch 1, turn (6)
Rows 2-70: BLSc in each across, Ch 1, turn (6)
Row 71: Holding Row 1 to Row 71 and stitching through both Rows, Sl st in each across, Ch 1 (6)
Turn work to begin working the body of the hat, working around the raw edge of your brim
Body of Toque:
Round 1: Sc in each around the raw edge once in the end of each Row of the brim, sl st to join, Ch 1 (70)
Round 2: CSC in each around, sl st to join, Ch 1 (70)
*Join Burgundy yarn and begin carrying the yarn until the points when you need it via the chart
Rounds 3-25: Follow the chart for color changes, carrying yarn, CSC in each around, sl st to join, Ch 1 (70)
Round 26: Sc in each around, sl st to join, Ch 1 (70)
Round 27: Sc decrease, Sc in next, repeat around, Sc in last, sl st to join, Ch 1 (48)
Round 28: Sc in each around, sl st to join, Ch 1 (48)
Round 29: Sc decrease, Sc in next, repeat around, sl st to join, Ch 1 (32)
Round 30: Sc in each around, sl st to join, finish off leaving a long tail (32)
With a tapestry needle, weave the long tail through all the stitches in Round 30, pull to cinch closed, weave end.
Make a pom pom in Burgundy, secure it onto the top of the hat by sewing through the center of the pom pom, and down throught the center of the hat several times, weave ends.
Faux Fair Isle Trees Cowl
Materials:
-1 skein each Lion Brand Vanna’s Choice in Beige and Burgundy
-Size J 6mm crochet hook
-Tapestry needle
Unique Stitches:
FpDc: front post double crochet – double crochet around the post of the Dc directly below it instead of inserting your hook into the top two loops as usual, finish double crochet as ususal
CSC: center single crochet – instead of stitching in the top two loops as you would with a normal single crochet, insert your hook into the center of the stitch, between the two pillars of the stitch itself (see video linked above for further instruction), finish single crochet as usual
With Burgundy, Ch 80, sl st to first Ch (next to slip knot) to form a loop, Ch 2
Round 1: Dc in 3rd st from hook and across, Ch 2, turn (78)
Round 2: Dc in first st, FpDc in next, repeat around, sl st to join, Ch 1 (78)
Round 3: Sc around, sl st to join, Ch 1 (78)
*Join beige yarn and begin carrying the yarn until the points when you need it via the chart
*Note: I chose to leave out the little + bits of the chart on my cowl but I wanted to add them into the chart if you’d like to include them.
Rounds 4-16: Follow the chart for color changes, carrying yarn, CSC in each around, sl st to join, Ch 1 (78)
Round 17: Sc in each around, sl st to join, Ch 2 (78)
Round 18: Dc in each around, sl st to join, Ch 2 (78)
Round 19: Dc in first st, FpDc in next, repeat around, sl st to join, finish off, weave ends
Don’t forget to PIN this pattern to your Pinterest boards!
Love this so much! Thank you for sharing!!! Can’t wait to get one started!
Thanks Ashleigh! Love this pair. I love your blog and the patterns you come up with.
Thanks so much Nancy!
Can’t wait to try this!!! Thank you so much!!! Your generosity is deeply appreciated!!!!!
This is gorgeous!
Absolutely brilliant. Many thanks.
I love this! I had all but given up on being able to ever do fair Isle, even though I can knit, but I think I could do this!
You certainly can, Sharon! It’s SO much easier than it looks too 🙂
YAY!! cant wait to start!! thank you for sharing!! <3
That is so pretty, I did not think it was a crochet pattern. Thank you
These patterns are so beautiful!!!!! I love the design and the stitch technique!! Thank you so much for sharing them!!!!
When clicked on the etsy.com link, it said $4.99 instead of $1.99 for the printable pattern. Is that the correct price? Thank you. Can’t wait to get started!
So sorry Shannon, typo! Yes the patterns are $4.99 for both on Etsy. 🙂
This is beautiful! Thank you so much for all your hard work. I too love the look of fair isle, and like you have not mastered the art of knit. It’s nice to be included in this club. Thanks again for making this available to us.
Can’t find the video for the CSC stitch. Thanks
The video I recommend watching is linked in the introduction 🙂
Help! Which stitch am I joining into at the end of each round? Nice easy pattern. Thank you!
Always join to the first stitch of the round, not the Ch.
This pattern is great so far. The colour changing took me a bit to get used to it but it’s going alright now!
I am wondering if I missed something though. I have never worked from a colour chart before.
Because the work isn’t being turned after each rounds, when reading the chart, is it worked each row left to right bottom to top every row?
I have a pretty wide space of only white stitches were the two edges of the chart essentially meet when working the pattern…. not sure if this is by design or if I am not understanding something in the chart.
Sorry, just to clarify, the wide white gap is between the first + and last + starting at row 18 on the chart. If that makes sense??
Yes, exactly! That’s where your seam would be 🙂
Yes Margaret, you’ve got it right! The back of the hat has a white gap between the start and finish of the pattern.