Disclosure: This shop has been compensated by Collective Bias, Inc. and its advertiser. All opinions are mine alone. #MoreHuggiesMoreSavings #CollectiveBias

Santa Baby!
I had to crochet this cute and cuddly Saint Nick for the holiday season this year, being that my little guy Parker is finally getting old enough to love on his crochet friends. So sweet!
Let me take you on a quick walk down memory lane. My mom had this plushy santa clause. She’s probably had him for three decades or so, and because she loves her holiday decorations like another child – I know it will be a loooong time until I get to have that santa. He’s kind of flat like a pillow with a big bushy beard and sweet smiling eyes. He’s extra cuddly and I’ve always loved him!

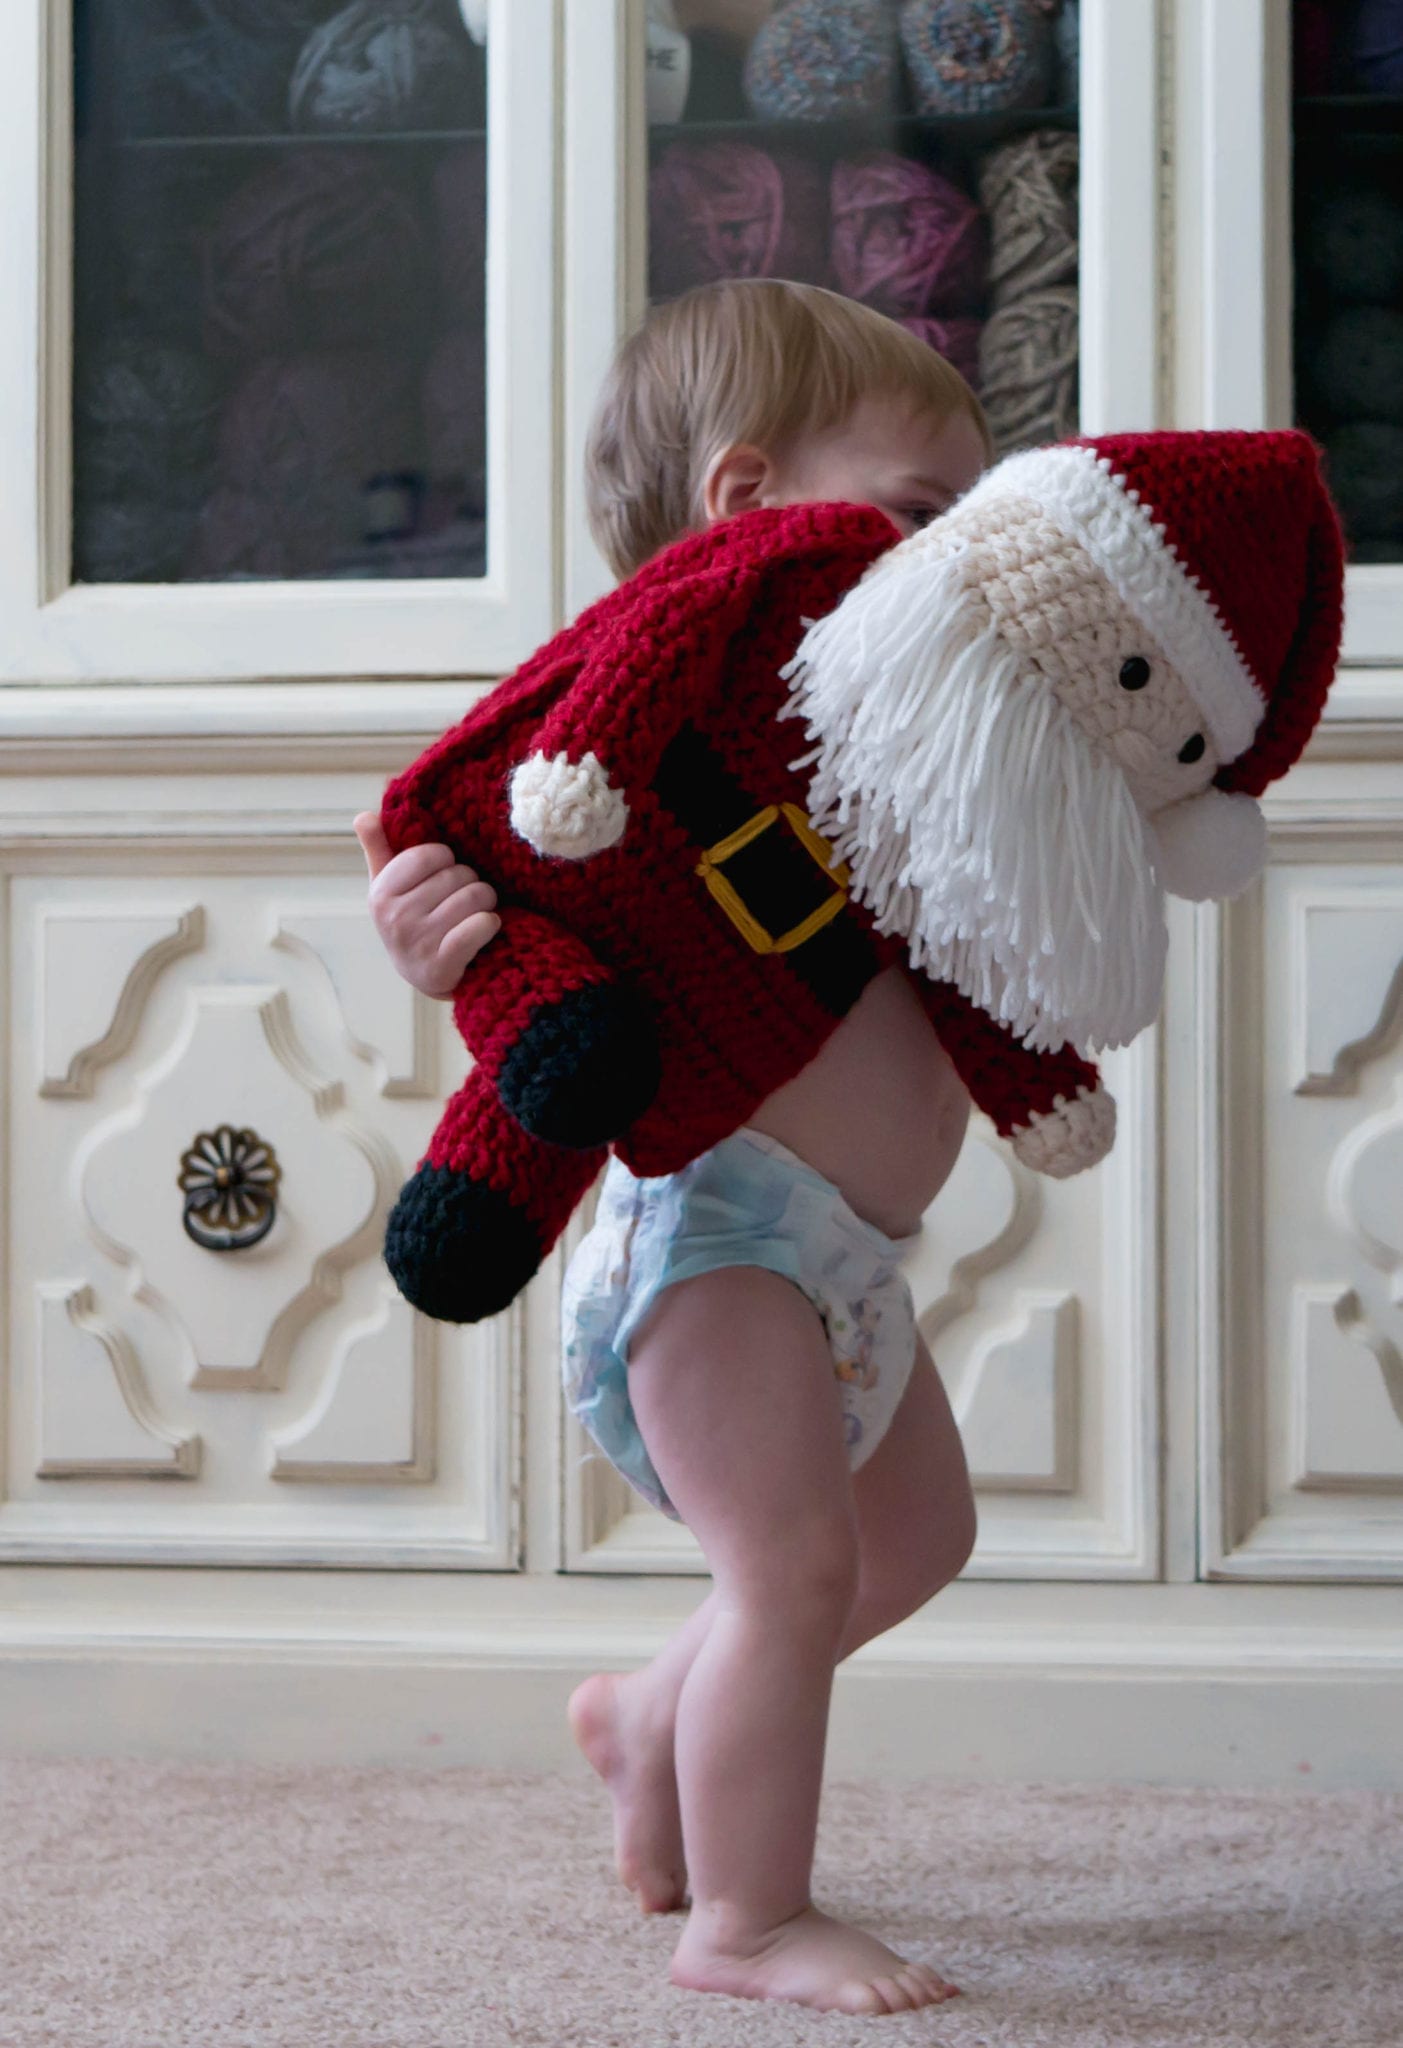
I decided to crochet my own version from memory and I can’t wait until she pulls out her Christmas decorations and we can compare the two Santas!
I decided to use more muted colors of yarn like Cranberry and gold instead of bright red and bright yellow, but those would make a cute Santa too! I just prefer the more vintage-y color pallete. Make your Santa the way you like him!

I’ve teamed up with Huggies® Diapers from Sam’s Club to bring you this cute Santa Baby Plushy for my son, Parker. Let me tell ya about them!
Around the holidays, there’s lots of stress and tight budgets – especially with a toddler to care for. I love that Huggies are available at Sam’s Club for super affordable prices. And in the middle of the season’s hustle and bustle, Sam’s Club have got you covered with my favorite Sam’s Club pickup service. Order your items online and drop by to pick up in store – I was in and out in under 5 minutes! Totally perfect for my holiday craziness.
If you join now you’ll get $45 in instant savings – just follow THIS LINK & start saving now. Simply buy any three participating Huggies® products to get rewarded. You can join on samsclub.com or you can join in club!
Join online now and get a $5 e-gift card. Sign up in just 3 easy steps!
- Join Sam’s Club
- Buy any 3 participating Huggies® products
- Get $45 instantly loaded onto your new Sam’s Club Membership Card
& there you go! The membership pays for itself and now you get easy pickup, great diapers, and great prices. If that isn’t a Christmas miracle, I don’t know what is!
PATTERN
- Get the ad-free, large print, printable PDF pattern HERE.
- Grab the Ultimate Pattern Bundle that includes 150+ patterns just like this one on sale for $20 today HERE.
- PIN this pattern to your Pinterest boards for later HERE.
- Add this pattern to your Ravelry queue HERE.
Materials:
-Worsted weight yarn (I used Lion Brand Vanna’s Choice)
- 2 skeins Cranberry
- 2 skeins Fisherman
- 1 skein White
- 1 skein Black
- small amount of gold or mustard (2 yrds)
-Size I 5.5mm crochet hook
-12mm safety eyes
-Polyfil stuffing
-Large eye tapestry needle
-Very sharp scissors (for trimming the beard)
-Clover pom pom maker (optional)
Notes:
-The entirety of this pattern is worked holding a double strand of yarn. When applicable, you can hold 1 strand from 2 separate skeins of yarn, or the beginning and end of the same skein of yarn.
-Safety eyes can be replaced with sewn eyes in black yarn or small black buttons
Dimensions:
19 in. x 25 in.
Belly
*make 2 panels
With Cranberry yarn, Ch 29, Dc in 4th and in each st, Ch 2, turn (26)
Rows 2-16: Dc in each st, Ch 2, turn (26)
*color change to Black for Rows 8-9 only
Row 17: Sc evenly around perimeter of the piece, working 3 Sc in each corner, sl st to join, finish off, weave ends
Make 2nd panel
With gold/mustard yarn, sew a “buckle” over center 4 sts of Rows 7-10. Weave ends.
Sew or Sc two panels together around entire perimeter. Just before closing, stuff lightly with polyfil. Weave ends.
Head
*make 2 panels
With Fisherman yarn, make a magic ring, Ch 2, 10 Dc inside ring, sl st to join, Ch 2 (10)
Round 2: 2 Dc in each st around, sl st to join, Ch 2 (20)
Round 3: 2 Dc, Dc, repeat around, sl st to join, Ch 2 (30)
Round 4: 2 Dc, Dc 2, repeat around, sl st to join, Ch 2 (40)
Round 5: 2 Dc, Dc 3, repeat around, sl st to join, Ch 2 (50)
Round 6: 2 Dc, Dc 4, repeat around, sl st to join, Ch 2 (60)
Round 7: 2 Dc, Dc 5, repeat around, sl st to join, Ch 2 (70)
Round 8: 2 Dc, Dc 6, repeat around, sl st to join, finish off, weave ends (80)
Make 2nd panel, don’t finish off.
Attach safety eyes over Round 3 (opposite the sl st seam) with 7 sts between them on one panel only.
Round 9: Hold panels together with wrong sides facing, Sc around working through both panels, just before sewn up completely stuff lightly with polyfil, finish Sc in each st around, sl st to join, finish off, weave ends.
Cut a spare piece of Fisherman yarn about 12 in. long. With a tapestry needle, sew over 5 sts of Round 1 under the safety eyes 4 or 5 times to make a button nose. Weave ends.
Beard
With single strands of white yarn, cut a pile of 8 in. pieces.
Double piece of yarn over, and use your hook to tie 2 strands of yarn over each st you like to be covered.
Begin tying on yarn toward the bottom of the head panel and work your way up until you like the way it looks.
I tied yarn over almost half of the head panel and did my best to make the beard even.
Use very sharp scissors to trim the bottom of the beard (I tapered mine to be longest in the middle and slightly shorter on the sides.)
Hat
With White yarn, Ch 55, sl st to 1st st (next to the slip knot) to form a loop, Ch 2, Dc in each st around, sl st to join, Ch 1 (55)
Round 2: Sc in each st around, sl st to join, color change to Cranberry, Ch 2 (55)
Round 3: Sc in each st around, sl st to join, Ch 2 (55)
Round 4: Sc decrease, Sc in next 3 sts, repeat around, sl st to join, Ch 2 (44)
Rounds 5-7: Sc in each st around, sl st to join, Ch 2 (44)
Round 8: Sc decrease, Sc in next 2 sts, repeat around, sl st to join, Ch 2 (33)
Rounds 9-11: Sc in each st around, sl st to join, Ch 2 (33)
Round 12: Sc decrease, Sc in next st, repeat around, sl st to join, Ch 2 (22)
Rounds 13-15: Sc in each st around, sl st to join, Ch 2 (22)
Round 16: Sc decrease around, sl st to join, Ch 2 (11)
Rounds 17-33: Sc in each st around, sl st to join, Ch 2 (11)
Round 34: Sc decrease around, Sc in last st, sl st to join, finish off leaving a long tail, sew up the closure (6)
Sew hat onto santa’s head with the back of the hat pulled further down than the front.
Sew end of hat (Round 34) folded down in front of the white brim to the right side of the head, about 2 Rounds of sts away from the right safety eye.
Make a small pom pom (I used the Clover Pom Pom maker 2 in. to make a perfect pom!)
Arms
*make 2
With Fishermarn yarn, make a magic ring, Ch 2, 10 Dc inside ring, sl st to join, Ch 2 (10)
Round 2: Dc in each st around, sl st to join, color change to Cranberry, Ch 2 (10)
Rounds 3-7: Dc in each around, sl st to join, Ch 2 (10)
Round 8: Dc in each around, sl st to join, Ch 1 (10)
Stuff lightly with polyfil stuffing.
Round 9: Smoosh Round 8 flat, sl st seam up across the top working through two sts at a time, finish off leaving a long tail for sewing (5)
Sew onto the body about 4 sts from the top on each side. Weave ends.
Legs
*make 2
With Black yarn, make a magic ring, Ch 2, 10 Dc inside ring, sl st to join, Ch 2 (10)
Round 2: 2 Dc in each st around, sl st to join, Ch 2 (20)
Rounds 3-4: Dc in each st around, sl st to join, Ch 2 (20)
Color change to Cranberry.
Rounds 5-7: Dc in each around, sl st to join, Ch 2 (20)
Round 8: Dc in each around, sl st to join, Ch 1 (20)
Stuff lightly with polyfil stuffing.
Round 9: Smoosh Round 8 flat, sl st seam up across the top working through two sts at a time, finish off leaving a long tail for sewing (10)
Sew onto body about 4 sts apart along the bottom of the body. Weave ends.
This is such a cute pattern. My sister crochets. I will have to share this with her. #client
Love the Santa and the child with him is adorable, Thank you for sharing both.
hugs,
gramzie (Carol)
Very CUTE!!!
Love this pattern! Are the dimensions correct? I have gone up 2 hook sizes and my piece is only 9.5 in wide.
Are you working with a double strand of yarn?
je vous aime beaucoup merci d’etre la
On the legs, is there a mistake? How do I go from 20 to10 stitches? I don’t see a decrease. Thank you
his there a vido for this.
I love the Santa but how do you attach the head so that it’s not floppy?
Mine is floppy, but will live on the couch or being played with by my son. So a little floppiness is okay for me! You may be able to run a dowel through to make it more stiff?
I’m just starting this pattern and the belly panel is only 10 inches wide. Are your dimensions including the length of the arms?
Yes they are!
Please help? I am a beginner and I am busy with this pattern and it is so easy to follow. Just a question, how do I join the head to the belly? I checked the whole pattern now again to make sure I didn’t miss it but still can’t seem to find it?
I just sewed mine on leaving a long tail. It overlaps a bit on the body and is a little floppy but sits up nicely on a couch or mantel!